Quantcast
Channel: Mummy's blog
Viewing all 51 articles
Browse latest View live

Available modules for TFS 2015 build tasks

$
0
0

It is not yet well documented but if you are writing a custom build task for your TFS 2015 build system, you get at your disposition some of the modules that are made available by your VsoWorker.
As I couldn’t find a list of available modules and cmdlets they expose, I decided to dig into them and see what is there. I also wanted to check if with the Update 1 (and the new version of the build agent) there will be more of them.
I wrote a handy task that will list all of the available cmdlets for all of the modules shipped by the agent worker. Following are my results.

With TFS 2015 the agent version delivered is 1.83.2. It offers the following modules:

  • Microsoft.TeamFoundation.DistributedTask.Task.Common.dll
  • Microsoft.TeamFoundation.DistributedTask.Task.Deployment.Azure.psm1
  • Microsoft.TeamFoundation.DistributedTask.Task.Deployment.Chef.psm1
  • Microsoft.TeamFoundation.DistributedTask.Task.DevTestLabs.dll
  • Microsoft.TeamFoundation.DistributedTask.Task.DTA.dll
  • Microsoft.TeamFoundation.DistributedTask.Task.Internal.dll
  • Microsoft.TeamFoundation.DistributedTask.Task.TestResults.dll

I will now list of all importable functions and cmdlets in those modules.

  • Microsoft.TeamFoundation.DistributedTask.Task.Common.dll
    • Add-TaskIssue
    • Complete-Task
    • Find-Files
    • Get-LocalizedString
    • Set-TaskProgress
    • Set-TaskVariable
    • Write-TaskDetail
  • Microsoft.TeamFoundation.DistributedTask.Task.Deployment.Azure.psm1
    • Get-AzureCmdletsVersion
    • Get-AzureModuleLocation
    • Get-AzureVersionComparison
    • Get-RequiresEnvironmentParameter
    • Get-SelectNotRequiringDefault
    • Import-AzurePowerShellModule
    • Initialize-AzurePowerShellSupport
    • Initialize-AzureSubscription
  • Microsoft.TeamFoundation.DistributedTask.Task.Deployment.Chef.psm1
    • Get-DetailedRunHistory
    • Get-PathToNewtonsoftBinary
    • Get-ShouldWaitForNodeRuns
    • Get-TemporaryDirectoryForChef
    • Initialize-ChefRepo
    • Invoke-GenericMethod
    • Invoke-Knife
    • Invoke-WithRetry
    • Wait-ForChefNodeRunsToComplete
  • Microsoft.TeamFoundation.DistributedTask.Task.DevTestLabs.dll
    • Complete-EnvironmentOperation
    • Complete-EnvironmentResourceOperation
    • Complete-ResourceOperation
    • Copy-FilesToAzureBlob
    • Copy-FilesToRemote
    • Copy-FilesToTargetMachine
    • Copy-ToAzureMachines
    • Get-Environment
    • Get-EnvironmentProperty
    • Get-EnvironmentResources
    • Get-ProviderData
    • Invoke-BlockEnvironment
    • Invoke-EnvironmentOperation
    • Invoke-PsOnRemote
    • Invoke-ResourceOperation
    • Invoke-UnblockEnvironment
    • New-OperationLog
    • Register-Environment
    • Register-EnvironmentDefinition
    • Register-Provider
    • Register-ProviderData
    • Remove-Environment
    • Remove-EnvironmentResources
  • Microsoft.TeamFoundation.DistributedTask.Task.DTA.dll
    • Invoke-DeployTestAgent
    • Invoke-RunDistributedTests
  • Microsoft.TeamFoundation.DistributedTask.Task.Internal.dll
    • Add-BuildArtifactLink
    • Add-BuildAttachment
    • Convert-String
    • Copy-BuildArtifact
    • Get-JavaDevelopmentKitPath
    • Get-MSBuildLocation
    • Get-ServiceEndpoint
    • Get-TaskVariable
    • Get-ToolPath
    • Get-VisualStudioPath
    • Get-VssConnection
    • Get-X509Certificate
    • Invoke-Ant
    • Invoke-BatchScript
    • Invoke-IndexSources
    • Invoke-Maven
    • Invoke-MSBuild
    • Invoke-PublishSymbols
    • Invoke-Tool
    • Invoke-VSTest
    • Publish-BuildArtifact
    • Register-XamarinLicense
    • Unregister-XamarinLicense
  • Microsoft.TeamFoundation.DistributedTask.Task.TestResults.dll
    • Invoke-ResultPublisher
    • Publish-TestResults

The Update 1 RC1 for TFS increased the agent to the version 1.89.0 and the RC2 incremented it to version 1.89.1. As of the time I’m writing this blog post, the RC2 is the latest version available, I’ll list and show the differences with a plain TFS 2015 build agent.

Three new modules are added:

  • Microsoft.TeamFoundation.DistributedTask.Task.CodeCoverage
  • Microsoft.TeamFoundation.DistributedTask.Task.Deployment.Internal
  • Microsoft.TeamFoundation.DistributedTask.Task.Deployment.RemoteDeployment

Following the list of all importable functions and cmdlets in the those modules.

  • Microsoft.TeamFoundation.DistributedTask.Task.CodeCoverage
    • Enable-CodeCoverage
    • Publish-CodeCoverage
  • Microsoft.TeamFoundation.DistributedTask.Task.Deployment.Internal
    • Get-OperationLogs
    • Get-ResourceCredentials
    • Get-ResourceFQDNTagKey
    • Get-ResourceHttpsTagKey
    • Get-ResourceHttpTagKey
    • Get-ResourceOperationLogs
    • Get-SkipCACheckTagKey
    • Get-SqlPackageCommandArguments
    • Import-DevtestLabsCommomDll
    • Write-ResponseLogs
  • Microsoft.TeamFoundation.DistributedTask.Task.Deployment.RemoteDeployment
    • Invoke-RemoteDeployment

Furthermore some cmdlets are added to the existing modules:

  • Microsoft.TeamFoundation.DistributedTask.Task.Deployment.Azure.psm1
    • Set-CurrentAzureRMSubscription
    • Set-CurrentAzureSubscription
  • Microsoft.TeamFoundation.DistributedTask.Task.DevTestLabs.dll
    • Get-ExternalIpAddress
    • Get-ParsedSessionVariables
  • Microsoft.TeamFoundation.DistributedTask.Task.Internal.dll
    • Get-IndexedSourceFilePaths
    • Get-TfsClientCredentials

It also seems that in the Microsoft.TeamFoundation.DistributedTask.Task.Internal.dll, Invoke-IndexSources cmdlet is not available any more.

You can reference these modules from your custom Build tasks by calling a standard import module cmdlet.

import-module "Microsoft.TeamFoundation.DistributedTask.Task.Common"

If you are interested about the agent version, you can check it by executing the vsoagent on your build server, with the following parameter:

VsoAgent.exe /version

As soon as an RTM version of the Update 1 becomes available, I’ll update this post.

In case you are interested in a short description of these functions, you can their source code for further info


PowerShell tips and tricks – Retrieving TFS collections and projects

$
0
0

Introduction

The following post is not really about a tip or a trick regarding a PowerShell itself. It’s more about on how to leverage some TFS libraries in order to automate processes regarding TFS via a PowerShell script. It will not show any fancy PowerShell technique but a way to query a TFS server of your choice, extract the necessary information and eventually make changes.

In this first tip we will see the essential, how to connect to the TFS, retrieve all of the available collections and list all of the projects for each TPC. Imagine that you are working on a TFS instance containing multiple collections, each one again having many projects (for many I do intend hundreds of projects in total). Verifying and changing settings on each one manually will not be easy nor convenient. As there is no UI for executing bulk operations on TFS, the easiest and most logical way to interact with it is through PowerShell. Let’s see how we can achieve that.

Prerequisites

Before we start, in order to be able to use these scripts you need to have at least PowerShell v3 installed and the necessary TFS libraries registered in GAC. The easiest way to make sure that you do have just mentioned libraries installed is to make sure that you do have Visual Studio installed on the machine you are executing this script from. Also it is good that the Visual Studio you added does match in version your TFS install. It means that if you do have TFS2013 installed, the best option will be to have Visual Studio 2013. For what concerns PowerShell, you do probably already have version 3 installed on your machine. The easiest way to check is to execute the following command:

$PSVersionTable.PSVersion

If is not the case that you do have PowerShell version 3 installed, you can do so by following this link: Windows Management Framework 3.0

In order to perform the call to the TFS server you need to have sufficient rights to do so. Managing collection objects require Edit instance-level information permission level, which is granted by default only to TFS admin. In case you do not have sufficient rights, you may encounter an exception reporting
Exception calling "GetCollections" with "0" argument(s): "Access Denied: Mario Majcica needs the following permission(s) to perform this action: Edit instance-level information"

Just for a sake of completeness I will add that this is not the only way of establishing a dialog with TFS, you could extract and set some of the information also through the REST API. Also some of the objects I do treat can be retrieved in a slightly more efficient way at the expense of simplicity.
In case you are interested about just mentioned techniques you can read the following post Building a TFS 2015 PowerShell Module using Nuget. Bare in mind that it is not targeting beginners as this blog post and it requires a deeper understanding on TFS Object Model and PowerShell.

Again, some utilities as Microsoft Visual Studio Team Foundation Server 2013 Power Tools do deliver PowerShell Cmdlets that can be used to work with different features of TFS such as changesets, shelvesets, workspaces and more. If interested in details about this approach I can advise you to Google out the argument or get your hands of a book called Windows PowerShell 4.0 for .NET Developers.

Let’s script

First things first. In order to reference the necessary libraries we need to issue the following command.

Add-Type -AssemblyName "Microsoft.TeamFoundation.Client, Version=12.0.0.0, Culture=neutral, PublicKeyToken=b03f5f7f11d50a3a"

This may seem a quite complicated way to load an assembly, unfortunately only a certain pre-defined set of assemblies can be loaded by their partial name. For all the rest a fully qualified name is necessary. In case you decide to use some other TFS functionalities, it may be necessary to reference other libraries.

Note, in case of Visual Studio 2015, the object model client libraries are removed from GAC. However the necesseray libraries are still available. In order to load them you need to approach the load in a different manner.

Add-Type -Path "C:Program Files (x86)Microsoft Visual Studio 14.0Common7IDECommonExtensionsMicrosoftTeamFoundationTeam ExplorerMicrosoft.TeamFoundation.Client.dll"

You need to point the Add-Type cmdlet to a path. It may vary based on the folder in which your Visual Studio is installed.

There is another option that may be a nice way to comply to this dependency. If you are an early adopter of PowerShell 5, you may retrieve the necessary package via OneGet.

Walking through TFS objects

All TFS libraries do have a same entry point. There are multiple factory classes, exposing static methods, that will give us the instance of classes implementing the requested interface thought whom we will perform desired operations. For a less experienced DevOps (at least less Dev’s more Ops) this may not make sense, thus let me try to explain it a bit better.
In order to use an object (a non-static class in this particular case) we need to construct an instance of it (and probably pass some parameters for its initialization). Via the factory pattern, adopted by Microsoft for this particular set of libraries, we are able to get the right instance of the class implementing the interface we are in need for. Still too complicated? Then I’m sorry, I’m already going way out of scope here.

In order to get the object through whom we will get the services we are in need for, we need to call a static method GetConfigurationServer on TfsConfigurationServerFactory class.
This call will return an instance of ConfigurationServer class which will be our main entry point for all the services.

$uri = "http://my.tfs.local:8080/tfs"
$tfsConfigurationServer = [Microsoft.TeamFoundation.Client.TfsConfigurationServerFactory]::GetConfigurationServer($uri)

As you can see I’m passing to the GetConfigurationServer method a parameter, which is the address of our TFS. It means that all of the operations performed through its service calls will be pointing to TFS indicated in this address.

Once our entry point is obtained, we can ask him to get us an instance of the class that implements the necessary logic to perform actions we are in need for.
In our case this is a class that implements ITeamProjectCollectionService interface.
We can request it with the following command

$tpcService = $tfsConfigurationServer.GetService("Microsoft.TeamFoundation.Framework.Client.ITeamProjectCollectionService")

Now that I do have a correct instance of the class that implements the interface which declares the methods I’m interested in, I will just call a method that will return a collection of TeamProjectCollection objects.
This method is called GetCollections and it is invoked as follows.

$tpcService.GetCollections()

I’m now able to iterate through this collection and retrieve, beside others, the name of each project collection. Each object in the collection represents a project collection on our TFS. There should be always at least one element in it.

Let’s recap our script before continuing.

Add-Type -AssemblyName "Microsoft.TeamFoundation.Client, Version=12.0.0.0, Culture=neutral, PublicKeyToken=b03f5f7f11d50a3a"

$uri = "http://tfs:8080/tfs"
$tfsConfigurationServer = [Microsoft.TeamFoundation.Client.TfsConfigurationServerFactory]::GetConfigurationServer($uri)
$tpcService = $tfsConfigurationServer.GetService("Microsoft.TeamFoundation.Framework.Client.ITeamProjectCollectionService")

$sortedCollections = $tpcService.GetCollections() | Sort-Object -Property Name

foreach($collection in $sortedCollections) {
    Write-Host $collection.Name
}

The only small detail I haven’t mentioned until now, is the fact that once I do retrieve the collections I do sort them base on the value of Name property.

Now that we have a list of all TPC’s we can construct a URL that will be used to get other services which as a starting point do require a reference to the TPC.
As just mentioned in order to construct the URL I will declare another variable and concatenate the TFS URL and the project name after which I can request an instance of TfsTeamProjectCollectionFactory class that I will use as the entry point for all the operations on the given TPC.

As already seen for the ITeamProjectCollectionService we need to obtain a service that will provide us with the necessary data. In our case this is ICommonStructureService3. It is all achieved by the following code.

Now we are able to invoke a method called ListProjects in order to get all of the projects part of that TPC.

$collectionUri = $uri + "/" + $collection.Name
$tfsTeamProject = [Microsoft.TeamFoundation.Client.TfsTeamProjectCollectionFactory]::GetTeamProjectCollection($collectionUri)
$cssService = $tfsTeamProject.GetService("Microsoft.TeamFoundation.Server.ICommonStructureService3")   
$sortedProjects = $cssService.ListProjects() | Sort-Object -Property Name

Each value in $sortedProjects will be of type ProjectInfo and within we will find all of the necessary information about that Team Project.
In between other properties and methods, as expected, we do have a property called Name. We will output the name of all the projects in that TCP.

The end result

I will add some of the formatting for our messages so that the output of the script is easier to read. Also I will collect the total number of projects. This code I do hope is not needed to be explained in detail. Following the complete script.

Add-Type -AssemblyName "Microsoft.TeamFoundation.Client, Version=12.0.0.0, Culture=neutral, PublicKeyToken=b03f5f7f11d50a3a"

$uri = "http://tfs:8080/tfs"
$tfsConfigurationServer = [Microsoft.TeamFoundation.Client.TfsConfigurationServerFactory]::GetConfigurationServer($uri)
$tpcService = $tfsConfigurationServer.GetService("Microsoft.TeamFoundation.Framework.Client.ITeamProjectCollectionService")

$sortedCollections = $tpcService.GetCollections() | Sort-Object -Property Name
$numberOfProjects = 0

foreach($collection in $sortedCollections) {
    $collectionUri = $uri + "/" + $collection.Name
    $tfsTeamProject = [Microsoft.TeamFoundation.Client.TfsTeamProjectCollectionFactory]::GetTeamProjectCollection($collectionUri)
    $cssService = $tfsTeamProject.GetService("Microsoft.TeamFoundation.Server.ICommonStructureService3")   
    $sortedProjects = $cssService.ListProjects() | Sort-Object -Property Name

    Write-Host $collection.Name "- contains" $sortedProjects.Count "project(s)"

    foreach($project in $sortedProjects)
    {
        $numberOfProjects++
        Write-Host (" - " + $project.Name)
    }
}

Write-Host
Write-Host "Total number of project collections" $sortedCollections.Count
Write-Host "Total number of projects           " $numberOfProjects

As there are plenty of properties available, your are able to change or check a setting on all of the projects in all of the TCP’s you have. This can be very handy for the maintenance task as we are going to see later in a blog post that I’m currently working on.

Happy coding!

PowerShell tips and tricks – Decoding SecureString

$
0
0

Introduction

It is quite common to get across SecureString type in PowerShell. If you ever needed to supply a credential object, at example to the Invoke-RestMethod cmdlet, then you for sure came across a SecureString. I will describe a couple of “tricks” that can be useful meanwhile working with SecureString objects.

Creating a SecureString

This is one of the most common cases. If you are constructing your System.Management.Automation.PSCredential object instance you need to provide a SecureString for the password argument in the constructor of just mentioned class. This implies that you need to transform your string to a SecureString. Luckily this is a trivial task since we have a cmdlet that can help us with that.

$securePassword = ConvertTo-SecureString –String $password -AsPlainText -Force

ConvertTo-SecureString will do just that. Be aware that you need to set two parameters in order to process your plain string correctly, and those are AsPlainText and Force.
AsPlainText indicates that you are providing a plain text as the input and that variable is not protected. With Force parameter you just confirm that you understand the implications of using the AsPlainText parameter and still want to use it.

Another way of creating a SecureString is to interactively prompt a user for information. You can achieve that in the following way.

$securePassword = Read-Host "Please enter the password" -AsSecureString

This is a indicated way of retrieving sensitive data if user interaction is required. Also you could request it through well known authentication dialog and retrieve the above mentioned PSCredential object. This object does expose a property called Password which is of type SecureString.

$credential = Get-Credential

As you can see, I used a Get-Credential cmdlet to trigger the authentication dialog.

If you need to persist your sensitive data in a text file or in a database, you can leverage ConvertFrom-SecureString cmdlet to transform your SecureString value into an encrypted string. Consider the following code:

ConvertFrom-SecureString $securePassword | Out-File C:\tmppassword.txt

Once stored, you can retrieve it again by

ConvertTo-SecureString -String (Get-Content C:\tmppassword.txt)

For using a custom key for the AES algorithm that is used for encryption by the ConvertFrom-SecureString cmdlet, you can specify it via a Key or SecureKey parameter. More info about this you can get directly on Technet site ConvertFrom-SecureString.
If no key is specified, the Windows Data Protection API (DPAPI) is used to encrypt the standard string representation.

Back to the string

We saw till now that we are able to create a SecureString from a plain text, express it as encoded string, and load it back to the SecureString object. What about getting a plain text out of our SecureString?
This is not an easy task to achieve. Luckily I came across the following article on MSDN which shows the right way to achieve this and translated it to PowerShell cmdlet. Next step was translating the shown code into PowerShell and encapsulating it in a cmdlet. This is the outcome.

function Get-PlainText()
{
	[CmdletBinding()]
	param
	(
		[parameter(Mandatory = $true)]
		[System.Security.SecureString]$SecureString
	)
	BEGIN { }
	PROCESS
	{
		$bstr = [Runtime.InteropServices.Marshal]::SecureStringToBSTR($SecureString);

		try
		{
			return [Runtime.InteropServices.Marshal]::PtrToStringBSTR($bstr);
		}
		finally
		{
			[Runtime.InteropServices.Marshal]::FreeBSTR($bstr);
		}
	}
	END { }
}

Now it is sufficient to pass your secure string as a parameter and you will retrieve the plain text behind it.

You may ask yourself, why? When can this be handy? It happened to me to be in need to construct an Authentication Header for Basic access authentication.
What is expected by the server is a header in your http request that equals to Authorization: Basic QWxhZGRpbjpvcGVuIHNlc2FtZQ== where the last string is a Base64 encoded string called token and it is composed of the username and password in the following disposition “username:password”. All of my authentication methods are using System.Management.Automation.PSCredential object to express and move credentials. This is where decoding a secure string was important.
For completeness I’ll show you other cmdlets I wrote to accomplish this task.

function Get-AuthenticationToken()
{
	[CmdletBinding()]
	param
	(
		[parameter(Mandatory = $true)]
		[System.Management.Automation.PSCredential]$Credential
	)
	BEGIN
	{
	}
	PROCESS
	{
		$password = Get-PlainText $Credential.Password;
		$key = [string]::Format("{0}:{1}", $Credential.UserName, $password)

		return [System.Convert]::ToBase64String([System.Text.Encoding]::UTF8.GetBytes($key))
	}
	END { }
}

As you can see, I do get a PSCredential object as a parameter, I decode the password, compose the token string and at the end create a Base64 representation of it.
That’s about it.

How do you intend to use this tip?

TFS 2015 Build System overview

$
0
0

Introduction

With TFS 2015 a new build system was introduced. If you were using Visual Studio Online you may already have seen it. With TFS 2015 the build system has been completely revamped.

Team Foundation Server has included a build system since its first release. Historically, we started running our builds with XML based MSBuild scripts using a windows service as host. With TFS 2010 a new build system was introduced. It included a more robust infrastructure based on build controllers and agents and the build process was driven by a Workflow Foundation XAML script. Although it had its own limitations and very steep learning curve it was maintained through two versions of TFS, 2012 and 2013. Luckily, with TFS 2015, Microsoft decided to solve major issues of the build system and came up with a new solution. The new build system is finally cross platform and provides more flexibility for infrastructure.

What’s new

A great news for all of you who do not fancy the WWF and XAML (and I’m part of that group), the process is no longer based on it! Infrastructure got simplified and as already mentioned, there is now support for Mac OSX and Linux. On Microsoft website you can find an overview of the new features at https://msdn.microsoft.com/Library/vs/alm/Build/feature-overview

Infrastructure

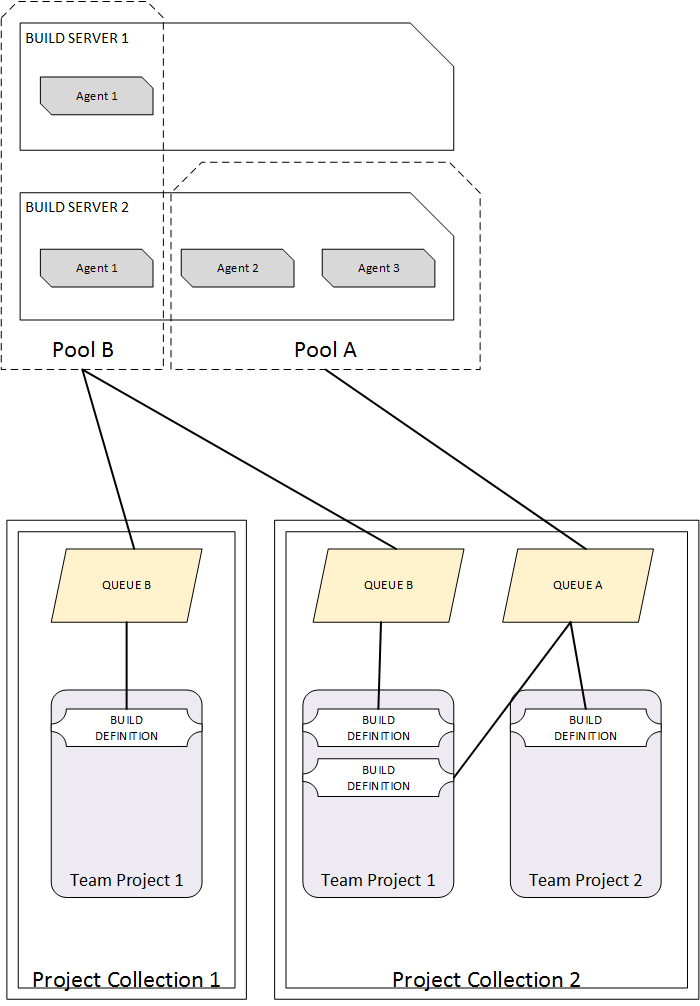
Some new concepts are introduced into the build infrastructure landscape. There is no longer the necessity for having build controllers and all of the limitations and complexity they brought. Instead, two new concepts are now there to help us with grouping and organizing our build resources. Pool and queues are only “organizational” units and do not require any specific software to be installed or configured.

Pools

A pool is essentially an association of a collection of one or more build agents to one or more queues. Pools are defined at the TFS application tier level. You can create as many pools as you like and you can assign pool administrators to each of them. Different people/groups can be assigned to different pools allowing different groups of people to manage your various build assets.

In synthesis, agent pools are used to organize and define permission boundaries around your build agents.

Queues

Queues are defined at the project collection level and are tied directly to a pool. A queue can be tied to at most one pool; however, a pool can be tied to more than one queue assuming the queues are configured on multiple project collections. As build definitions are created they are associated with a queue. The queue you select for a build definition ultimately limits the set of build agents that can be utilized for the builds generated by that definition.

When you create a new queue you must immediately select the pool that is associated with it. You can also choose to have the queue created and associated with the new pool automatically at the time the pool is created (it’s an option on the new pool dialog).

Agents

The build agent is a small application residing on a build server, a machine that is intended to be used for executing automated builds. The build agents are responsible for building your application (based on the build definitions). Although a pool can be associated with many build agents, a build agent is associated with at most a single pool. With the new build system a Microsoft Cross Platform Build Agent is available and Mac OSX and Linux platforms are supported. We will see later on how to proceed with the installation of a build agent.

The following diagram is a schematic overview of these concepts:

PoolsAndQueues

Build process

Build process has drastically changed. We do not have any more the build process template, which is substituted by a collection of build tasks (steps). In order to define your build process, you will add one or more build tasks in your build definition. By default several build tasks are available as Visual Studio Build, Visual Studio Test and many more. As you can guess, each of them perform an operation in order to accomplish the process you had in mind for your build.

TFS 2015 Build Tasks

More tasks are available online as also all the source code of all the tasks that are available on TFS. You can find a list of the ones supplied by Microsoft at the following address https://msdn.microsoft.com/Library/vs/alm/Build/steps/index and the relevant source code at https://github.com/Microsoft/vso-agent-tasks.

Aside of this important change, there are several things we can benefit of, such as, versioning and real-time output.

Versioning

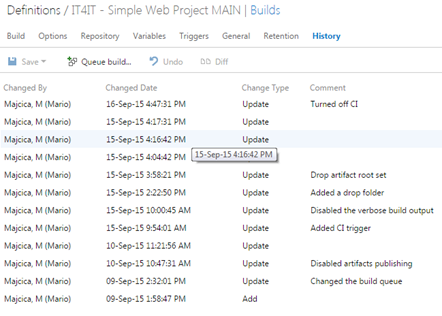
Build definition versioning and auditing is introduced with the new system so now you can easily see who made the change and exactly what change was made on your build definition. Any change to build definition is logged and you can add a note corresponding to your changes. You can see what changed and revert to the desired version directly from the web interface.

TFS 2015 Build definition history

Real-time output

Some of the most noticeable things about the way that build runs under this new system are the ability to get a real-time visibility while the build runs, which means that we will spend less time trying to dig through logs to see what really happened with your build. You can expect that you will get the same output as your build run locally.

Interface

Unlike the previous version, where you can only make changes to your build definition from Visual Studio, new build definition management is all web based. You do not need any other tool than your web browser in order to create, execute and manage your builds.

Build task anatomy

Every build task is composed from at least a file describing the build task. Describing a task and defining the elements in the interface is done via a predefined structure expressed via a JSON format. At example:

{
   "id": "61ed2e1d-efb7-406e-a31b-81f5d22e6d54",
   "name": "TestTask",
   "friendlyName": "Name that is displayed in the list",
   "description": "Testing new TFS 2015 build system.",
   "category": "Package",
   …

At the bottom of the task file you need to indicate the name of the associated PowerShell script which actually implements the logic of the task itself, or its node .js equivalent in case the task is meant to run cross-platform. If the task should run on both windows and xplat agents, you can indicate both:

"execution": {
   "Node": {
      "target": "ant2.js",
      "argumentFormat": ""
   },
   "PowerShell": {
      "target": "$(currentDirectory)\ant.ps1",
      "argumentFormat": "",
      "workingDirectory": "$(currentDirectory)"
   }
}

Other custom files such as executable can also be shipped with the task. In case you need to localize the task, it can be done by adding the necessary resources. Also you can specify the icon that will represent the task.

Once all of the necessary items are in the folder, you need to zip it and upload to the server. Uploading is done by calling a specific resource on TFS REST API or by utilities provided by Microsoft. Currently only ‘Agent Pool Administrators’ are able to add/update or remove tasks. Tasks are server-wide, this means that you will upload to the server, not to a specific collection or project.

Once you start creating your custom task, the best thing is to check how certain functionalities are implemented by peeking at the source code of the tasks available on GitHub.

TFS 2015 Update 1

As of today, Microsoft started shipping Update 1 for TFS 2015. It brings a couple of things in regard to a build system. With this update, build administrators can now add permissions to agent queue, which will restrict who can use that queue in a build definition. Several new build tasks are added and several minor improvements are present.
For a full list of the improvements you can consult the release notes.

I hope this post gave you an idea about what the new build system brings and made some of the new concepts clearer. If you are not enthusiastic about it maybe the following article could help you getting the right reasons to onboard on TFS 2015 build system.
In the following months I plan to extensively write about TFS 2015 and it’s new build system, bringing several examples from a real life implementation and answers to the questions I got during a training course I held on this argument.

I bet you will enjoy it.

Happy building!

TFS 2015 Build Agent failing syncing the repository

$
0
0

I would like to share with you my last struggle with TFS. I received a call from a colleague about some problem with the ‘new’ TFS build. Initially I tough it is only a miss-configuration and that the solution will be trivial, but as you can imagine, it wasn’t.

The problem lied in the fact that build agent couldn’t retrieve the sources and the error message was not treated as such. You could only see logged a (workspace version -1) inside the Get Sources step, after stating that syncing the repository was done.

workspace_version_-1

As a first thing, I tough about agent not having sufficient rights to retrieve the source code. After a quick check and making sure that the agent service user has sufficient rights to retrieve the code, I run my build again and I got the same result. Didn’t helped.

Next thing I checked all sort of settings, running the build on a different build agent on different server, running the agent under different account, making sure that permissions for the _work folder are setup correctly, all sort of things. I ended up realizing that if I moved the code from that Team project to another team project, suddenly my build agent was able to retrieve the code again. There where two things, or the project was corrupted or there where some security issues. Thanks to the Microsoft support assistance, I managed to get to the right solution. And guess what? It was a security issue.

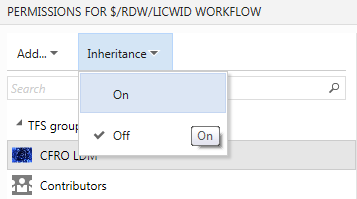
For an unknown reason the permission inheritance was disabled on the folder that contained all of the interested branches.

permission_inheritance_off

By enabling this setting, I saw that there is a small change in the way build agents are authenticated against TFVC. XAML build agent identifies itself with the user that agent runs under. 2015 build agent in the other hand, uses a Project Collection Build Service group to do so. It is added automatically to the source code permissions tree, and in order to propagate it needs to have the permission inheritance switched on or you need to manually set rights for that user group.

Same goes for the owner of the local workspace created by the agent.

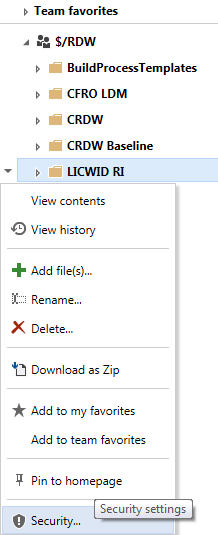
You can change those settings by editing the security for a give item in the source control.

security_settings

Once this is done, you should see your build agent syncing the sources correctly.

Tough life behind a proxy

$
0
0

In many enterprises when it comes to Internet access you will find yourself behind a proxy server. In such conditions many application do require a specific setup or they will not work at all. Recently I had to install a npm package from the official public npm repository and the “usual” command doesn’t work. Thus in case of npm client behind a proxy server, you need to pass the following argument --proxy.

My command from:

npm install -g tfx-cli

became

npm --proxy http://my.proxy.com:8080 install -g tfx-cli

Also, as I am actively using Visual Studio Code, I had an unpleasant surprise. If you do tend to install a Visual Studio Code extension (plugin) and you are behind a proxy, at the moment you are doomed. There is no way, in the latest version at the time of writing, to install Visual Studio Code extension if behind a proxy.

When it comes to .NET software development, all of the commonly used classes as HttpClient do cope well with proxy, the only problems is that developers rarely think about it and do not implement adequate support. In this particular case specifying a proxy in HttpClientHandler is the solution, which then needs to be passed to the HttpClient constructor.

So fellow developers please have mercy for all of the people behind a proxy, it ain’t an easy life!

PowerShell tips and tricks – Multipart/form-data requests

$
0
0

Introduction

If you ever came across a need to invoke a request that needs to oblige to Multipart/form-data standard in PowerShell, you probably got to know quite quickly that none of commonly used cmdlets do support it.
Both, Invoke-WebRequest and Invoke-RestMethod are unaware on how to format the request body in order to comply to Multipart/form-data standard. In order to succeed in your intent, you probably Googled this out, and the best you could find are a couple of questions on StackOverflow that are showing on how to manually set the message body and then invoke your call with one of above mentioned cmdlets. I did it too. Still I was not satisfied by the answers I found. Although what proposed could be written in a slightly better way, still it was not optimal. First of all the memory footprint that it has. In case you are transmitting a large amount of data, all of the objects are loaded into memory.
After trying this approach, I dug into the .Net framework and found out that all that we need is right there. True, it is only available on .Net 4.5, and if that is not an obstacle, I would advise you to follow that approach. HttpClient and connected classes do have all of the necessary to support Multipart/form-data standard. Initially I created a prototype in a form of a small C# application and once succeed I translated all of that into PowerShell.

In this post I will show you both, PowerShell approach by formatting the request body and transmitting via Invoke-WebRequest cmdlet, as using an approach that is less resource intensive and is based on HttpClient .Net class.

Lets start.

Throw everything in

Multipart/form-data standard requires the message body to follow a certain structure. You can read more about it in the RFC 2388.
Aside the body structure, there is a concept of a boundary. Boundary is nothing else than an unique string that will be used for delimitation purposes inside the message body. It will be specified in the request header and used inside the message body to circumvent files that we intend to transmit.

As I mentioned earlier, this approach constructs the body string in a variable and once ready invokes the Invoke-WebRequest cmdlet to execute the call.

function Invoke-MultipartFormDataUpload
{
    [CmdletBinding()]
    PARAM
    (
        [string][parameter(Mandatory = $true)][ValidateNotNullOrEmpty()]$InFile,
        [string]$ContentType,
        [Uri][parameter(Mandatory = $true)][ValidateNotNullOrEmpty()]$Uri,
        [System.Management.Automation.PSCredential]$Credential
    )
    BEGIN
    {
        if (-not (Test-Path $InFile))
        {
            $errorMessage = ("File {0} missing or unable to read." -f $InFile)
            $exception =  New-Object System.Exception $errorMessage
			$errorRecord = New-Object System.Management.Automation.ErrorRecord $exception, 'MultipartFormDataUpload', ([System.Management.Automation.ErrorCategory]::InvalidArgument), $InFile
			$PSCmdlet.ThrowTerminatingError($errorRecord)
        }

        if (-not $ContentType)
        {
            Add-Type -AssemblyName System.Web

            $mimeType = [System.Web.MimeMapping]::GetMimeMapping($InFile)
            
            if ($mimeType)
            {
                $ContentType = $mimeType
            }
            else
            {
                $ContentType = "application/octet-stream"
            }
        }
    }
    PROCESS
    {
		$fileName = Split-Path $InFile -leaf
		$boundary = [guid]::NewGuid().ToString()
		
    	$fileBin = [System.IO.File]::ReadAllBytes($InFile)
	    $enc = [System.Text.Encoding]::GetEncoding("iso-8859-1")

	    $template = @'
--{0}
Content-Disposition: form-data; name="fileData"; filename="{1}"
Content-Type: {2}

{3}
--{0}--

'@

        $body = $template -f $boundary, $fileName, $ContentType, $enc.GetString($fileBin)

		try
		{
			return Invoke-WebRequest -Uri $Uri `
									 -Method Post `
									 -ContentType "multipart/form-data; boundary=$boundary" `
									 -Body $body `
									 -Credential $Credential
		}
		catch [Exception]
		{
			$PSCmdlet.ThrowTerminatingError($_)
		}
    }
    END { }
}

As you can see, we are preparing “by hand” the correct message body and executing Invoke-WebRequest in order to send our file. It is not efficient at all as it encodes the whole file as a string and keeps it in memory. Consider transmitting large files and make yourself an idea on the memory footprint of this approach. Aside that, it is just not elegant!

Wait a moment, what a waste

Previously shown method is as said, not elegant and waists resources. A better approach is to let the HttpClient class handle everything. It is way more efficient as it uses streams in order to read our file and transfers it to http StreamContent. It is less resource intensive and a more elegant solution.

Let’s see now how our refactored Invoke-MultipartFormDataUpload cmdlet looks like:

function Invoke-MultipartFormDataUpload
{
    [CmdletBinding()]
    PARAM
    (
        [string][parameter(Mandatory = $true)][ValidateNotNullOrEmpty()]$InFile,
        [string]$ContentType,
        [Uri][parameter(Mandatory = $true)][ValidateNotNullOrEmpty()]$Uri,
        [System.Management.Automation.PSCredential]$Credential
    )
    BEGIN
    {
        if (-not (Test-Path $InFile))
        {
            $errorMessage = ("File {0} missing or unable to read." -f $InFile)
            $exception =  New-Object System.Exception $errorMessage
			$errorRecord = New-Object System.Management.Automation.ErrorRecord $exception, 'MultipartFormDataUpload', ([System.Management.Automation.ErrorCategory]::InvalidArgument), $InFile
			$PSCmdlet.ThrowTerminatingError($errorRecord)
        }

        if (-not $ContentType)
        {
            Add-Type -AssemblyName System.Web

            $mimeType = [System.Web.MimeMapping]::GetMimeMapping($InFile)
            
            if ($mimeType)
            {
                $ContentType = $mimeType
            }
            else
            {
                $ContentType = "application/octet-stream"
            }
        }
    }
    PROCESS
    {
        Add-Type -AssemblyName System.Net.Http

		$httpClientHandler = New-Object System.Net.Http.HttpClientHandler

        if ($Credential)
        {
		    $networkCredential = New-Object System.Net.NetworkCredential @($Credential.UserName, $Credential.Password)
		    $httpClientHandler.Credentials = $networkCredential
        }

        $httpClient = New-Object System.Net.Http.Httpclient $httpClientHandler

        $packageFileStream = New-Object System.IO.FileStream @($InFile, [System.IO.FileMode]::Open)
        
		$contentDispositionHeaderValue = New-Object System.Net.Http.Headers.ContentDispositionHeaderValue "form-data"
	    $contentDispositionHeaderValue.Name = "fileData"
		$contentDispositionHeaderValue.FileName = (Split-Path $InFile -leaf)

        $streamContent = New-Object System.Net.Http.StreamContent $packageFileStream
        $streamContent.Headers.ContentDisposition = $contentDispositionHeaderValue
        $streamContent.Headers.ContentType = New-Object System.Net.Http.Headers.MediaTypeHeaderValue $ContentType
        
        $content = New-Object System.Net.Http.MultipartFormDataContent
        $content.Add($streamContent)

        try
        {
			$response = $httpClient.PostAsync($Uri, $content).Result

			if (!$response.IsSuccessStatusCode)
			{
				$responseBody = $response.Content.ReadAsStringAsync().Result
				$errorMessage = "Status code {0}. Reason {1}. Server reported the following message: {2}." -f $response.StatusCode, $response.ReasonPhrase, $responseBody

				throw [System.Net.Http.HttpRequestException] $errorMessage
			}

			return $response.Content.ReadAsStringAsync().Result
        }
        catch [Exception]
        {
			$PSCmdlet.ThrowTerminatingError($_)
        }
        finally
        {
            if($null -ne $httpClient)
            {
                $httpClient.Dispose()
            }

            if($null -ne $response)
            {
                $response.Dispose()
            }
        }
    }
    END { }
}

Conclusion

There is still space for improvement, however in my case it is good enough and I will not continue extending this cmdlet. If you think this is not enough or good enough, please extend it and let me know. As an idea, you may make possible passing multiple files via the pipeline and execute the upload only once, in the END step. In that way it may be more efficient and flexible. Also supporting some other common parameters as Proxy would be beneficial to others. If any let me know, I would be happy to hear from you in comments.

Uploading XL Deploy DAR package via PowerShell

$
0
0

Introduction

Recently at my customer’s site, I started using XebiaLabs product called XL Deploy. It is a software solution that helps automating the deployment process. Many operations are exposed via a REST API. Uploading of packages is one of them and is done following the Multipart/form-data standard. In case you need to do so, via PowerShell, you may be surprised about the difficulty of something that appears to be a trivial task. As you may know, PowerShell doesn’t play well with Multipart/form-data requests. I will show you a cmdlet that I wrote that can be handy in accomplishing this task.

Welcome Send-Package cmdlet

Before showing you the actual cmdlet that will send a package to XL Deploy I need to mention that the core of this cmdlet is Invoke-MultipartFormDataUpload cmdlet about which I blogged earlier.

First of all two small helper cmdlets. As the file name needs to be specified in the URL, we need to encode it. This may be done with some simpler code for this particular case, however I will show you a cmdlet that I’m using also for other XL Deploy calls where this approach is necessary.

<############################################################################################ 
    Encodes each part of the path separately.
############################################################################################>
function Get-EncodedPathParts()
{
    [CmdletBinding()]
    param
    (
        [string][parameter(Mandatory = $true)]$PartialPath
    )
    BEGIN { }
    PROCESS
    {
        return ($PartialPath -split "/" | %{ [System.Uri]::EscapeDataString($_) }) -join "/"
    }
    END { }
}

The other one will make sure that the URL passed in is formatted correctly for XL Deploy and that is a valid URL.

<############################################################################################ 
    Verifies that the endpoint URL is well formatted and a valid URL.
############################################################################################>
function Test-EndpointBaseUrl()
{
	[CmdletBinding()]
	param
	(
		[Uri][parameter(Mandatory = $true)]$Endpoint
	)
	BEGIN
	{
		Write-Verbose "Endpoint = $Endpoint"
	}
	PROCESS 
	{
		#$xldServer = $serviceEndpoint.Url.AbsoluteUri.TrimEnd('/')
		$xldServer = $Endpoint.AbsoluteUri.TrimEnd('/')

		if (-not $xldServer.EndsWith("deployit", "InvariantCultureIgnoreCase"))
		{
			$xldServer = "$xldServer/deployit"
		}

		# takes in consideration both http and https protocol
		if (-not $xldServer.StartsWith("http", "InvariantCultureIgnoreCase"))
		{
			$xldServer = "http://$xldServer"
		}

		$uri = $xldServer -as [System.Uri] 
		if (-not ($uri.AbsoluteURI -ne $null -and $uri.Scheme -match '[http|https]'))
		{
			throw "Provided endpoint address is not a valid URL."
		}

		return $uri
	}
	END { }
}

This cmdlets and the one I described in the previous post are required to be available for our new upload cmdlet. After having assured that they are available we can write a cmdlet I named Send-Package.

<############################################################################################ 
    Uploads the given package to XL Deploy server.
############################################################################################>
function Send-Package()
{
    [CmdletBinding()]
    PARAM
    (
        [string][parameter(Mandatory = $true)][ValidateNotNullOrEmpty()]$PackagePath,
        [Uri][parameter(Mandatory = $true)][ValidateNotNullOrEmpty()]$EndpointUrl,
        [System.Management.Automation.PSCredential]$Credential
    )
    BEGIN
    {
        if (-not (Test-Path $PackagePath))
        {
            $errorMessage = ("Package {0} missing or unable to read." -f $PackagePath)
            $exception =  New-Object System.Exception $errorMessage
			$errorRecord = New-Object System.Management.Automation.ErrorRecord $exception, 'SendPackage', ([System.Management.Automation.ErrorCategory]::InvalidArgument), $PackagePath
			$PSCmdlet.ThrowTerminatingError($errorRecord)
        }

        $EndpointUrl = Test-EndpointBaseUrl $EndpointUrl
    }
    PROCESS
    {
        $fileName = Split-Path $packagePath -leaf
        $fileName = Get-EncodedPathParts($fileName) 

        $uri = "$EndpointUrl/package/upload/$fileName"

        $response = Invoke-MultipartFormDataUpload -InFile $PackagePath -Uri $uri -Credential $credentials

        return ([xml]$response).'udm.DeploymentPackage'.id
    }
    END { }
}

You can now invoke this cmdlet and pass the requested parameters. If the call succeeds you will get back the package id.

At example:

$uri = "http://xld.majcica.com:4516"
$filePath = "C:\Users\majcicam\Desktop\package.dar"
$credentials = (Get-Credential)

$packageId = Send-Package $filePath $uri $credentials

Write-Output "Package was uploaded successfully with the following id: '$packageId'"

In case you do not want to provide credentials interactively, the following cmdlet may help you:

<############################################################################################ 
    Given the username and password strings, create a valid PSCredential object.
############################################################################################>
function New-PSCredential()
{
	[CmdletBinding()]
	param
	(
		[string][parameter(Mandatory = $true)]$Username,
		[string][parameter(Mandatory = $true)]$Password
	)
	BEGIN
	{
		Write-Verbose "Username = $Username"
	}
	PROCESS
	{
		$securePassword = ConvertTo-SecureString –String $Password -asPlainText -Force
		$credential = New-Object –TypeName System.Management.Automation.PSCredential –ArgumentList $Username, $securePassword

		return $credential
	}
	END { }
}

That’s all folks! I tested this scripts with XL Deploy 5.1.0 and 5.1.3 and had not encountered any issues. If any, do not hesitate to comment.

Happy deploying!


Nexus Repository Manager OSS as Nuget server

$
0
0

Introduction

In the past years I heard a lot of bad excuses when it came to NuGet package management. Mentioning Nexus in many .Net shops I had a chance to work in, put a strange ‘fear feeling’ in the air. None of those two chaps are to be in fear off and, surprise surprise, they work exceptionally well together. In this post I would like to tell you how to set up a NuGet proxy repository and a local, private, NuGet repository on Nexus Repository Manager OSS. I will guide you through the installation of Nexus Repository Manager OSS and all of the necessary setup tasks in order to create your own NuGet server that will proxy the calls to NuGet.org and store your own packages. I will mentions also some details about the configuration and maintenance and show you how to set up your tooling in order to work with it. It is going to be a pretty long post, so if interested, keep on reading. I hope that I can convince you to give a change to Nexus and get the best out NuGet.

Prerequisites

In order ton install Nexus you need to make sure that a couple of things are in place.
First thing, make sure JRE is installed. In the command prompt run java -version. If command executed successfully you are ready to go. If not, download the right version for your OS at http://www.java.com/en/download/manual.jsp. Still make sure that you are running at least JRE version 8u31+, as it is strongly recommended by SonaType.

Operating system requirements are specified at the following link https://support.sonatype.com/hc/en-us/articles/213464208-Sonatype-Nexus-System-Requirements.

Download the latest version of SonaType Nexus at http://www.sonatype.org/nexus/go/. At the moment of writing the current version is 2.12.0.

Installing Nexus

In order to install Nexus Repository Manager OSS, you need to extract the content of the downloaded file inside a directory. In my case this will be D:\Nexus. Once done get inside a folder called nexus-2.x.x-xx\bin and execute the following commands, nexus install, and once done, nexus start. You will see something similar to this:

D:\Nexus\nexus-2.12.0-01\bin>nexus install
wrapper  | nexus installed.

D:\Nexus\nexus-2.12.0-01\bin>nexus start
wrapper  | Starting the nexus service...
wrapper  | Waiting to start...
wrapper  | nexus started.

D:\Nexus\nexus-2.12.0-01\bin>

Now let’s get on the default address http://localhost:8081/nexus.

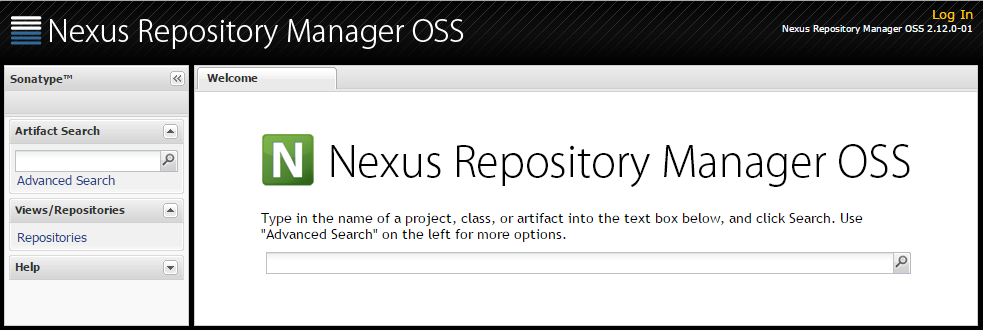
If all went well you should see the following:

welcome_screen

Login by following the link in the up-right corner. Default administrative account is admin with a password equal to admin123. Once logged in you will see in the menu on the left side additional options. We are now ready to start configuring our repositories.

I also advise you to check the list of recommended post installation configuration steps in the Post-Install Checklist.

Nuget proxy repository

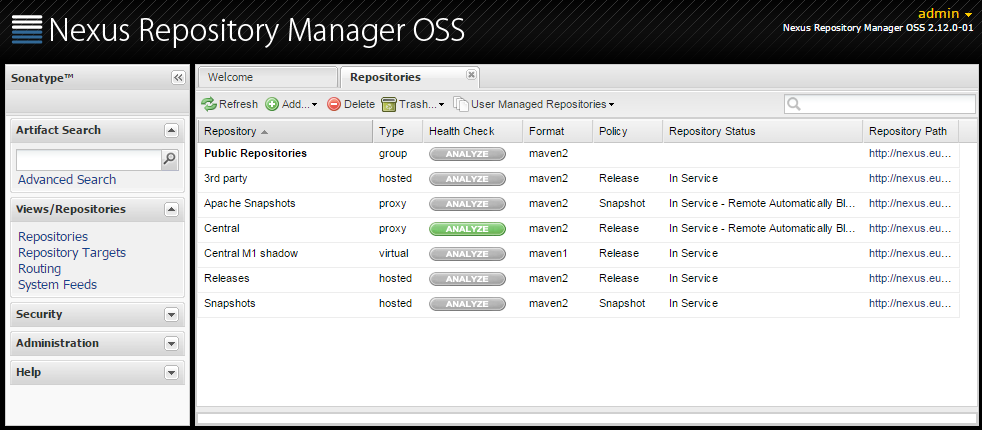
By default, Nexus Repository Manager OSS ships pre-configured with several repositories. If you intend to used it only as a Nuget repository/proxy you can remove all of them.

repositories

This happens to be my case, so I will remove all of the pre-configured repositories. Once you delete all of them, you should see a message saying, No repositories defined.

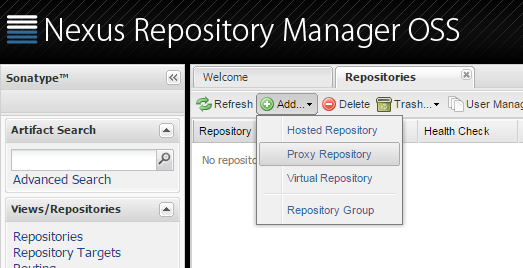
I will now add a repository that will proxy calls towards the Nuget.org public repository. Click on add a choose Proxy repository.

add_proxy_repo

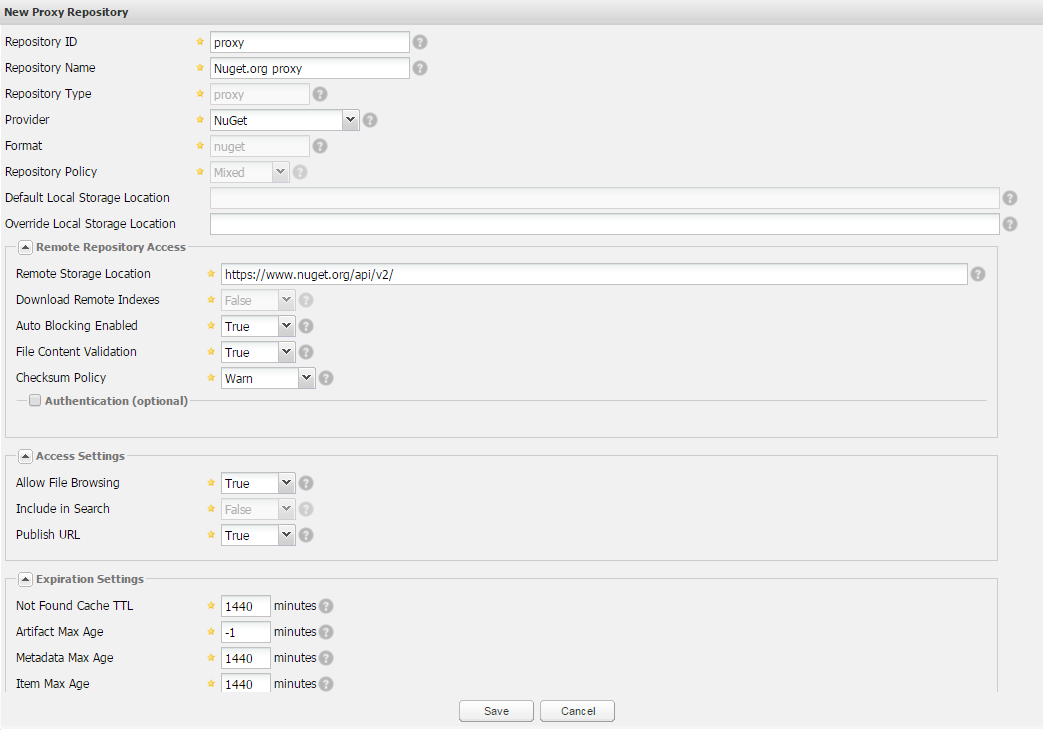
At the bottom of the screen you will be asked to fill in all the necessary details. Let’s analyse the important ones.

Repository ID: I am going to choose a vary concise name here, as this will be a part of our feed url. I will set it to proxy.

Repository Name: This is just a name that will be assigned to this repository and it will only be visible from the Nexus repositories management interface. I will set it to Nuget.org proxy.

Provider: It needs to be set to NuGet.

Remote Storage Location: Here we will set the link to the NuGet.org feed. Currently it is https://www.nuget.org/api/v2/

This are all of the necessary parameters. Once filled in, you can click on Save.

new_proxy_repo

If you now select the just created repository and then open the NuGet tab, you will find the link to your feed. In my case it is http://localhost:8081/nexus/service/local/nuget/proxy/.
First part of the link is obviously wrong. You will not be able to use this feed from any other machine than the server itself. It is displayed as local host as that is the url that we used to access the administration interface. It needs to be http://yournexusservername:8081/nexus/service/local/nuget/proxy/ where yournexusservername is the name of the machine. We will see later how to influence this url.

Nuget private repository

In case you have your own, private NuGet packages, that you would like to publish and retrieve, Nexus Repository Manager OSS can help you with that too. You need to create a hosted repository. For this repository you need to set the same settings as for the proxy, except the Remote Storage Location. I’ve set Repository ID to ‘private’ and Repository Name to ‘Nuget local repository’.
Once created, under the NuGet tab, you will find the personal API key that you need to use via NuGet.exe in order to push a package to this repository.

api_key

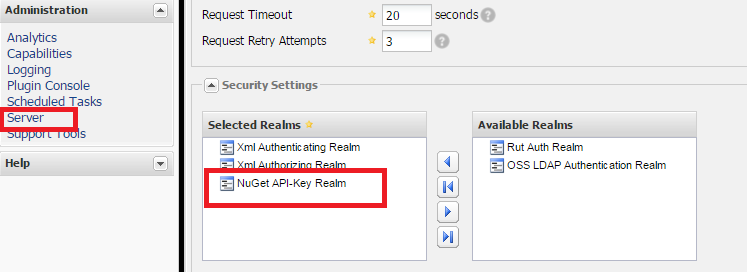
One last step is necessary before you get to be able to upload your packages. We need to enable the authentication and to do so, you will need to set NuGet API-Key Realm.

security_settings_realms

Under the Server settings, make sure that NuGet API-Key Realm is under the Selected Realms, which by default is NOT.

Now you can set your Api Key and push your package.

Api keys are on per user basis generated. Each user has it’s own unique key, and if you intend to upload the packages under a specific user profile, make sure you get the right key. Log in as that user and check the above mentioned property.

Living under the same roof

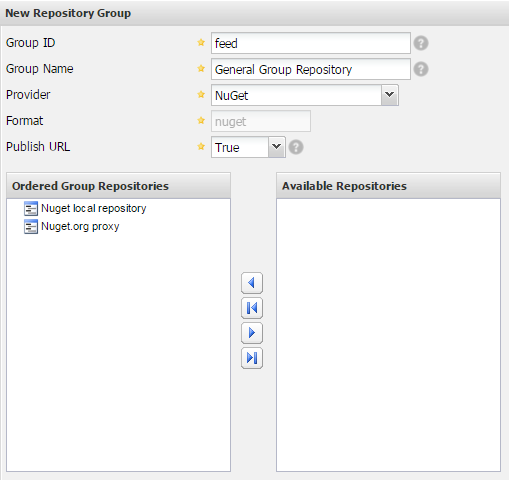
Having multiple repositories and feeds can be unhandy to setup and maintain. Lucky Nexus Repository Manager OSS offers a solution that can consolidate multiple repositories under a single feed. A repository group hides multiple repositories behind a single address/feed and allows us to modify the underlying repositories, add new ones or make other changes, without the need to change the configuration in any of your projects or in the tooling. Also it gives a lot of flexibility in setting up different policies and strategies in managing your repositories.
In order to create a Repository Group, under the repository management, choose Add then Repository Group option.

new_repository_group

Same settings are mandatory as for the private repository with one addition. You need to choose which repositories will be part of this group.

Tidying up

Link to our feed as it is right now is quite verbose and hard to recall, http://yournexusservername:8081/nexus/service/local/nuget/proxy/. Instead of pointing to yournexusservername we may consider adding a CNAME into our DNS and then point it to that machine. This will also ease the maintenance later on, if we do decide to move the service to another machine. In that case it will be sufficient to re-point DNS to the new machine and no changes to the feed URL will be necessary.

Another thing that stands out is that Nexus Repository Manager OSS web server as it’s feeds do run on port 8081. If this is an option, it will be easier to run it on port 80 (or 443 in case you plan to use SSL). you can also notice that ‘nexus’ part of URL (context root) just after the port number, it also may not be necessary and removing it will shorten all of the url’s.

I registered a CNAME in my domain and called it nexus. Now by calling http://nexus.maio.local:8081/nexus I’m able to reach my server. In order to get server running on port 80 and remove that nexus suffix, we need to get to the conf folder (in my case D:\Nexus\nexus-2.12.0-01\conf) and edit the file called nexus.properties. We are interested in changing two properties under # Jetty section. First one is application-port which by default is set to 8081. You need to set this to 80. Second property we are going to change is nexus-webapp-context-path and we need to change if from /nexus to just a /. This will set the context root with no prefix and make our URL shorter.
At the end your configuration file should look like following:

...
# Jetty section
application-port=80
application-host=0.0.0.0
nexus-webapp=${bundleBasedir}/nexus
nexus-webapp-context-path=/
...

Now it will be sufficient to restart the nexus windows service in order the changes to take the effect. In case no other application is using the port 80, restart should succeed and we are now able to get to the administrative interface by just calling http://nexus.maio.local/.
Also my feed now changes to http://nexus.maio.local/service/local/nuget/proxy/ which is shorter and easier to remember.

To make sure that the URL’s are not based on the upcoming request, you will need to set the base URL in the server settings.

application_server_settings

Set the base URL accordingly to your CNAME and remove the nexus from context root. You would like also to check the Force Base URL option as then the current settings will be considered for all of the links and Nexus Repository Manager will not base any on the upcoming request URL.

Other considerations

Proxy

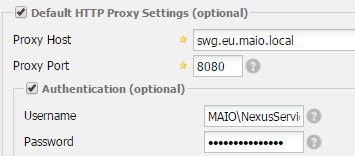
In case your Nexus Repository Manager is behind a proxy you will need to set the relevant settings inside the Server panel. Make sure that you set both HTTP and HTTPS settings as NuGet.org feed uses HTTPS.

http_proxy_settings

It is sufficient to indicate the proxy host, port and the Authentication credentials (Username and password).

License and Vulnerability Tracking

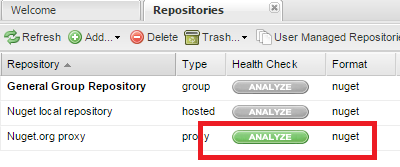
This is a very neat feature that is offered by Nexus Repository Manager OSS. For our proxied repository we are able to activate Repository Health Check. If active Nexus Repository Manager OSS will return actionable quality, security, and licensing information about the open source components in the repository. This will give us an overview of the mentioned metrics for all of the packages that were served by our proxy feed. To enable it, click on the analyse button and after some time you will see the results.

activate_rhc

On the SonaType blog you can find a video interview made to Marcel de Vries that talks this argument in the detail.

Maintenance

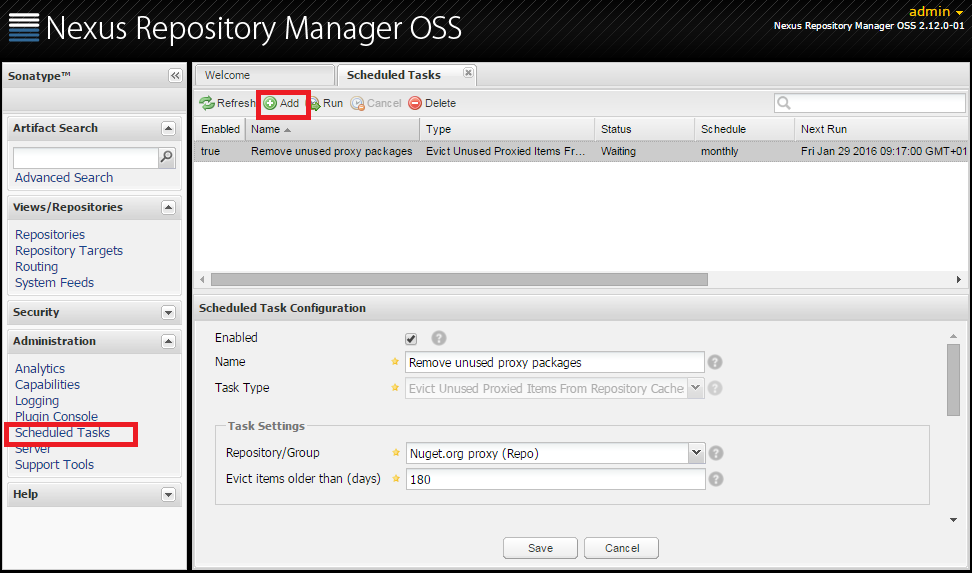
In case you are planning to use your proxy intensively you may be concerned about the disk space it may require to support all of the packages that are cached by the proxy. In that case you could opt for an out of the box task. If you open the Scheduled Tasks panel and Add a new scheduled task, there is a predefined task that will do just that.

scheduled_tasks

Create a Scheduled task of type ‘Evict Unused Proxied Items From Repository Caches’. On a given schedule it will remove all of the items for the chosen repository that are older than a number of days you set.

Support and documentation

Nexus is a well documented project. You can find more information about all of the arguments treated in this blog post and much more at http://books.sonatype.com/nexus-book/reference/index.html. Also in case you encounter a problem and can’t find an answer about, there is a support even for a free OSS version at https://support.sonatype.com/hc/en-us/categories/201980798.

Visual Studio feed

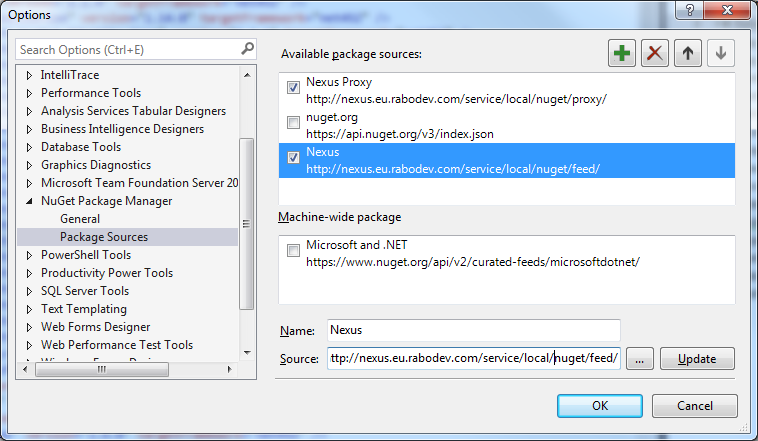
Adding a new feed in Visual Studio is an ordinary task. Select the following menu Tools > NuGet Package Manager > Package Manager Setting. Then in the Options window, select Package Sources and add a new one by clicking on the plus button. You can name the new feed to Nexus and set the source to http://nexus.maio.local/service/local/nuget/feed/. Press Update, then OK.

package_sources_options

This will allow you to access NuGet.org through Nexus Repository Manager OSS in Visual Studio.

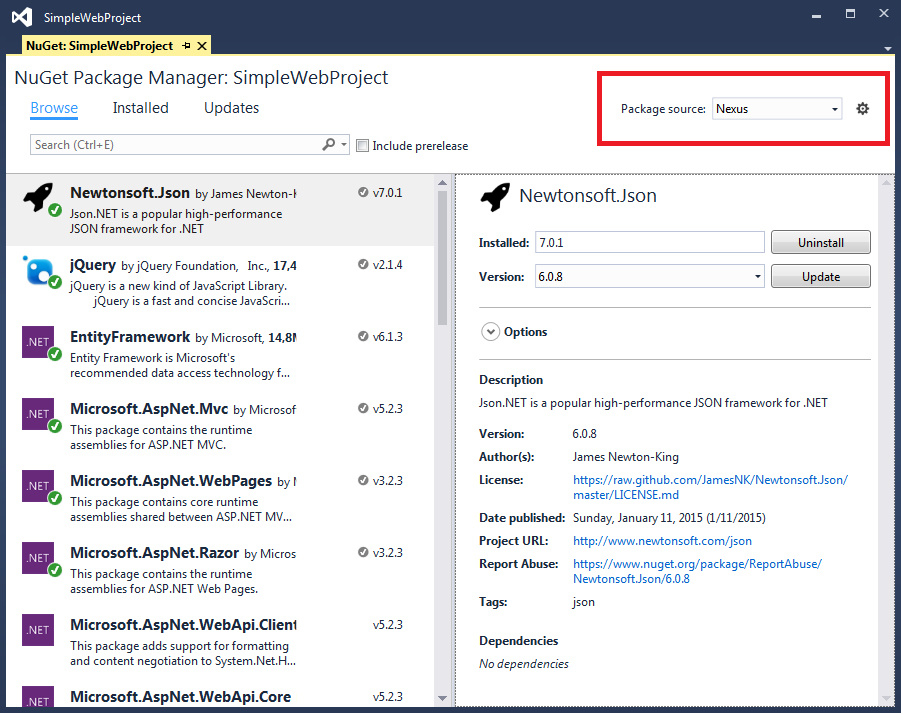
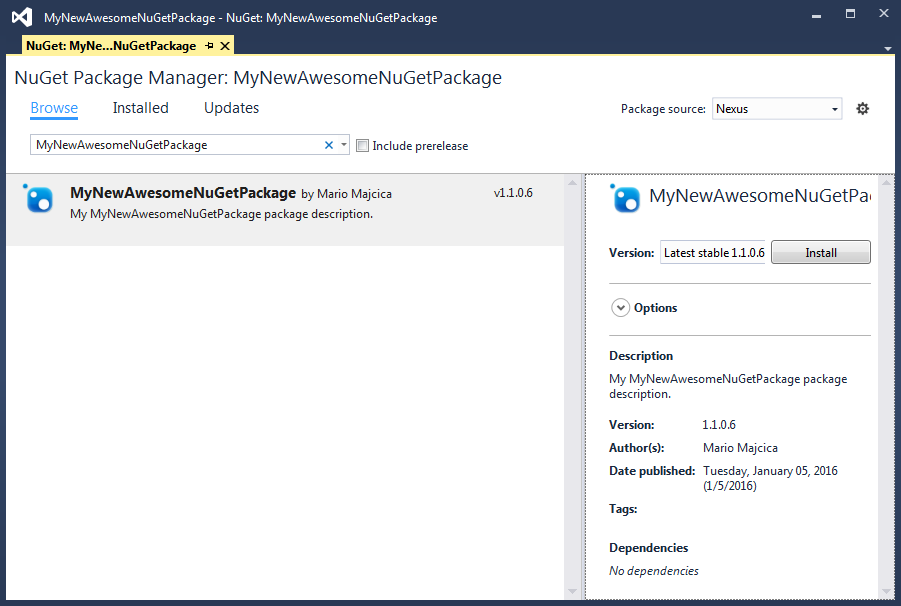
Now in the NuGet Package Manager select the newly added Package Source and you are ready to browse and install the available packages.

nuget_package_manager

If you added a group feed, you will be able to retrive both NuGet.org and your private packages through the same feed.

Build agent package restore

Before we enable the NuGet package restore in our build task we need to make sure that we have the necessary inside our nuget.config file. If you do not have a nuget.config file, you can place it in one of the paths that are listed in NuGet documentation.
In the package sources you need to add the new feed. Consider the following example.

<?xml version="1.0" encoding="utf-8"?>
<configuration>
  <packageSources>
	<add key="Nexus" value="http://nexus.maio.local/service/local/nuget/feed/" />
  </packageSources>
</configuration>

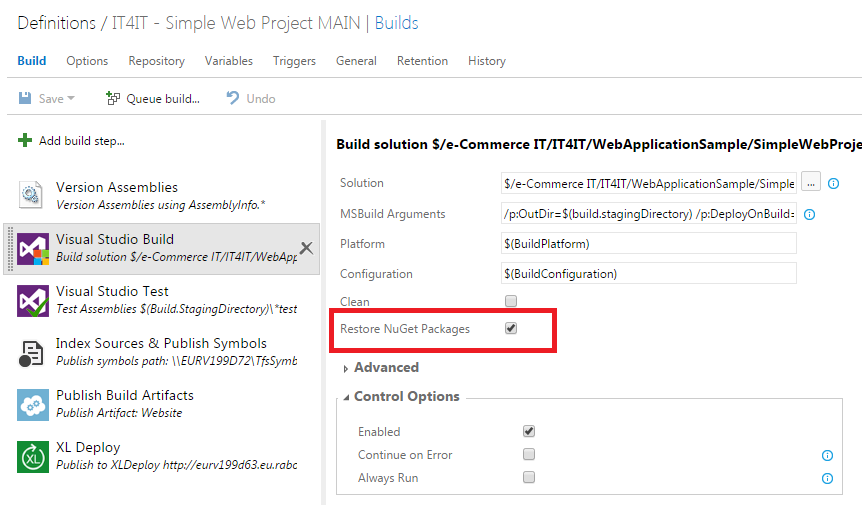
Now you need to check in this file and enable the package restore on your build task.

build_task

This should be now sufficient for the build agent to retrieve all of the necessary packages via Nexus Repository Manager OSS.
You can now remove the packages folder from the source code and request a clean build. In the build console then you will find references about packages being restored.

Manually uploading a package

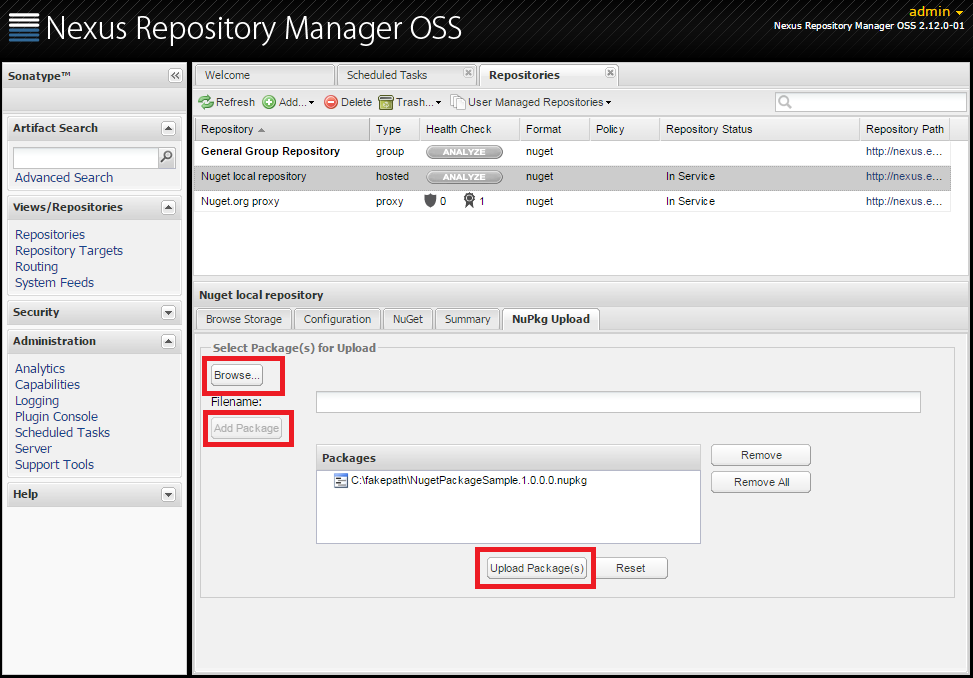
Our custom NuGet packages can be uploaded via the Nexus Repository Manager OSS web interface. Select your repository and go to the NuPkg Upload tab.

nupkg_upload

In that tab, select Browse and choose your .nupkg file. Then click on Add package and if that is the only one you would like to upload, choose Upload Package(s) button. If all goes well you will see the upload confirmation message. If you get to browse storage tab and refresh it, you should see your package uploaded.
To be sure that we can retrieve our custom package (also via the group repository) let’s get in Visual Studio and search for it.

search_hosted_package

As you can see, we are able to find our package both via our hosted repository feed as also via the group repository. This shows all of the potential of the group repositories and the way it eases the maintenance.

I came in an situation in which I was not able to find via group repository the package I uploaded. In case you upload a package that is present (matches the name and version of the package) in your proxy repository (NuGet.org), your package will not be shown. This is however an edge case and in real life situation you should never encounter such a situation. Still I think it is worth mentioning as during a trial it can happen and I do not want you to freak out about it.

Uploading the package via TFS 2015 build

With TFS 2015 Update 1 a new build task called NuGet Publisher is made available. It can help you with uploading your package to any NuGet repository. After adding the above mentioned build task to your build definition you will be presented with the following options:

nuget_publisher

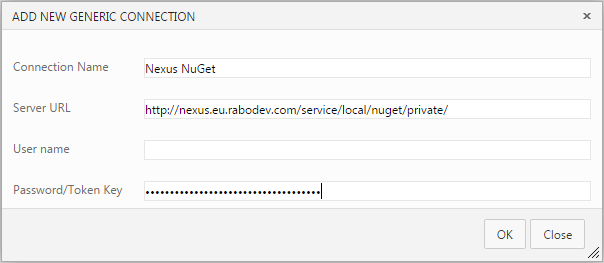
It is sufficient to define a new NuGet Server Endpoint only once. If you choose manage and then add new generic endpoint you will need to specify your feed as server URL, assign an arbitrary name to this endpoint and set you ApiKey as Password/Token Key value.

In our example name is Nexus NuGet, Server URL is http://nexus.maio.local/service/local/nuget/private/ and Password/Token Key is 626d4343-965f-30bc-858e-a322672acf54.

nexus_endpoint

Now that the endpoint is set, we need to specify a minimatch pattern that will point to our NuGet package. In the picture above you can see that I’m pointing my search for all the packages in the the staging folder, where my package is created. This will depend largely on your build definition and what you are trying to achieve.

This is sufficient to upload automatically from your build a new version of your package to our local NuGet server.

In case you are interested in building the package based on your sources and your nuspec file directly by your build definition, you can use NuGet Packager build step to achieve that. This is however out of scope for this blog post.

Uninstall Nexus

Last but not least, removing Nexus. In case you are not satisfied with Nexus you should remove it correctly. Luckily it is trivial.
As for the installation, let’s get into nexus-2.x.x-xx\bin folder. Following are the commands to execute and the relative output.

D:\Nexus\nexus-2.12.0-01\bin>nexus stop
wrapper  | Stopping the nexus service...
wrapper  | nexus stopped.

D:\Nexus\nexus-2.12.0-01\bin>nexus uninstall
wrapper  | nexus removed.

After both of these commands succeeded, you can safely remove the folder for your disk. In case you set a non default path for the repository storage, you can remove that one also.

Conclusion

That’s all folks! I hope I covered all of the arguments you may be interested in when it comes to Nexus Repository Manager OSS and NuGet. I do hope that this will encourage you in using or improve your current NuGet services setup.
Running XL TestView as a service

$
0
0

Introduction

If you started working with XL TestView you may have noticed in the user manual the following: ‘To run XL TestView as a service on Microsoft Windows, use a service runner.’. This differs quite a bit from other products of XebiaLabs that you may have used, as XL Deploy, where a yajsw (Yet Another Java Service Wrapper) is provided. Yet Another Java Service Wrapper will take care of adding the service into your system and handling all of the necessary. This is however not the case with XL TestView. I’m going to show you a proven way of running XL TestView as a service via NSSM.

The Non-Sucking Service Manager

NSSM – the Non-Sucking Service Manager is a tool which allows any application/executable to run as a windows service without much hassles. As an advantage above other tools of this kind is the fact that it handles failure of the application running as a service. Also the users are helped with a graphic interface during the configuration.
In order to start, download NSSM and extract the content of the zip file in a folder that we are going to create in program files, like C:\Program Files\NSSM. NSSM should work under Windows 2000 or later. Specifically, Windows 7 and Windows 8 are supported. 32-bit and 64-bit binaries are included in the download and I will use for this example the 64 bit version. For installing NSSM correctly the last thing left to do is to add the NSSM path to the system path.
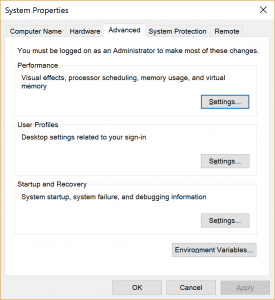
Open Control Panel > System and Security > System and choose Advanced System Settings. This will open the System Properties window.

SystemProperties

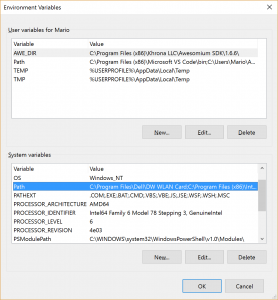
In System Properties window choose Environment Variables and the namesake window will open.

EnvironmentVariables

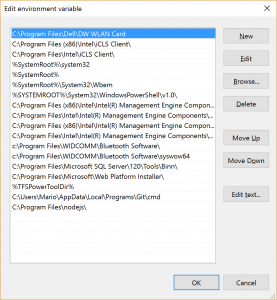
In lower part of that window you will find system variables. Search for the system variable called Path, select it and choose edit. Now, this is the part which defers in between different versions of Windows. In Windows 10 and Windows Server 2016 you will be presented with an editor and previous versions will show all of the variables in a text box. I will show you how this is done on Windows 10, however on earlier versions of Windows get at the end of the string in the text box, and add ;C:\Program Files\nssm\win64. Notice that the semicolon at the beginning is not a typo. Multiple items in that string are separated by semicolon. In case of Windows 10 just choose New and add the path to the list.

EditEnvironmentVariables

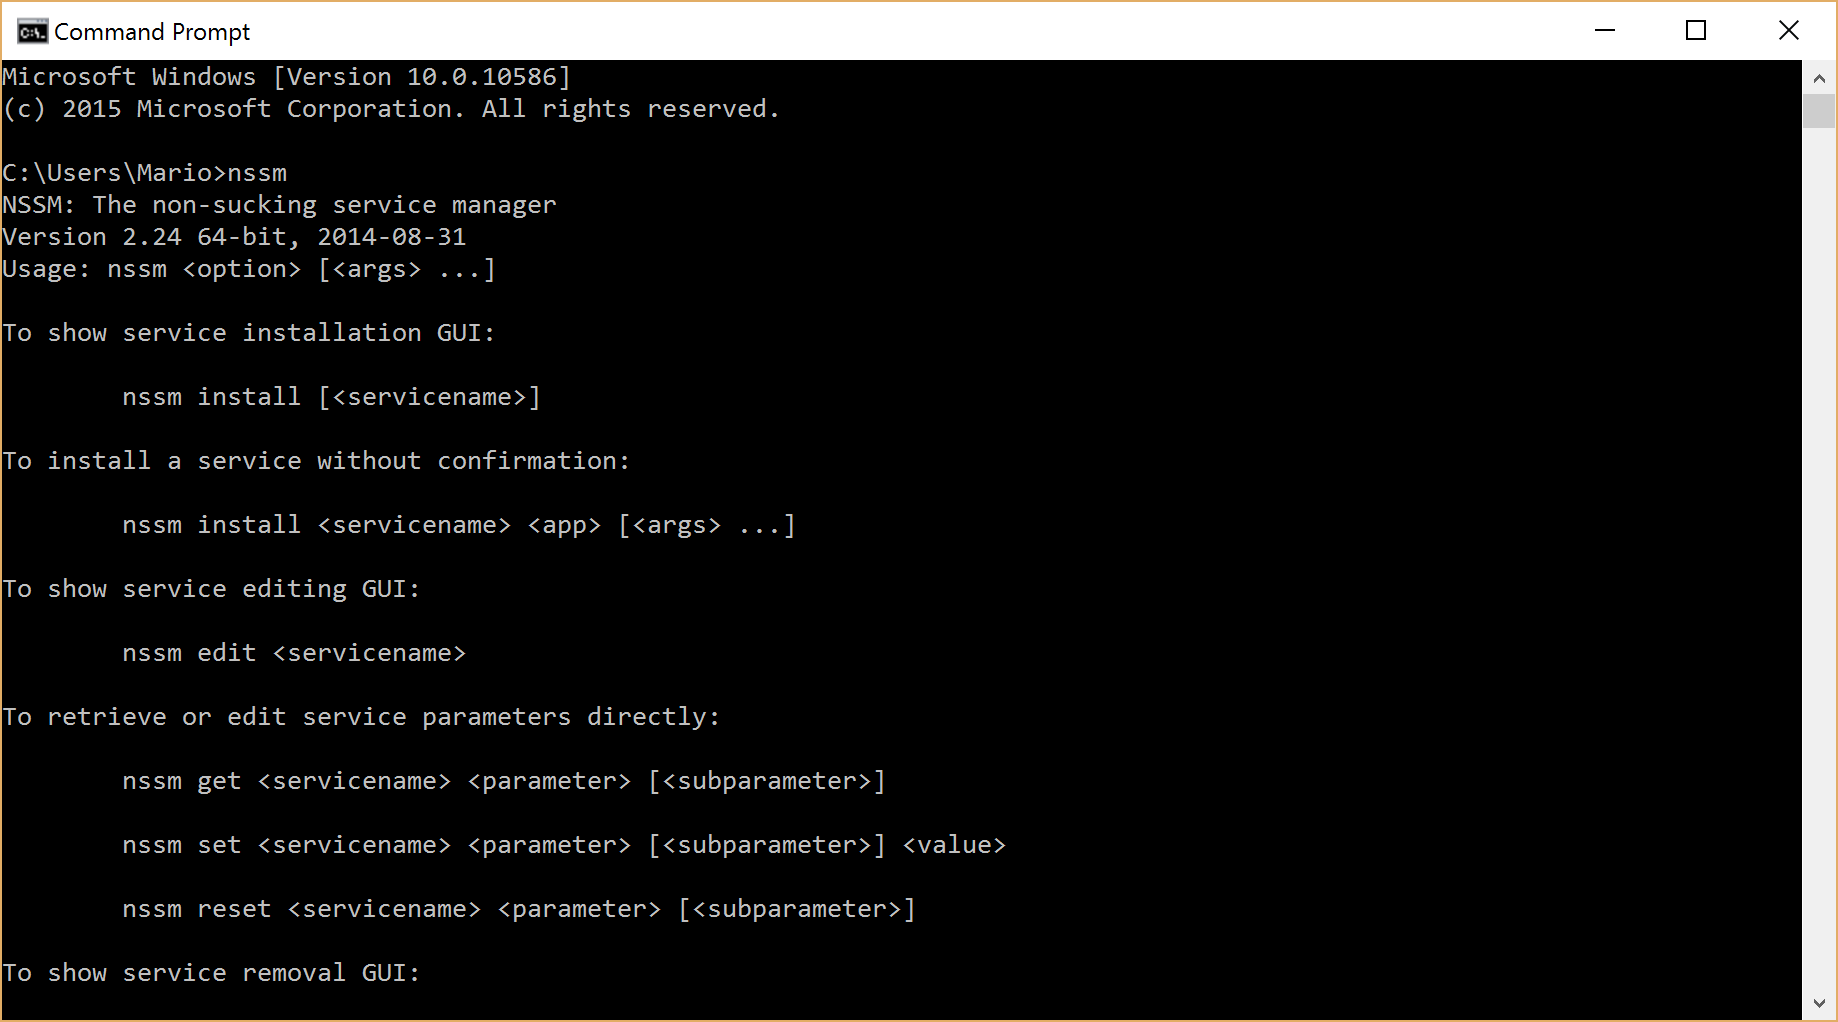
In order to verify that is all setup correctly, open the command prompt and execute the following command, nssm. You should see something similar to what shown in the following figure.

CommandNSSM

If this is the case, you installed NSSM correctly.

Creating the service

Before proceeding any further make sure that you are able to run XL TestView interactively as indicated in the user manual. Once XL TestView is installed correctly and capable of starting, stop it (CTRL+C).
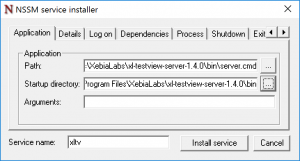
Now execute the following command, nssm install xltv. This will launch NSSM graphic interface which will allow you to create a new service called xltv. You should see the following

NSSMInstaller

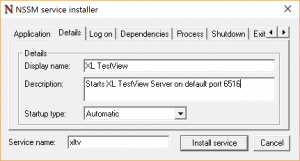
Fill in the path to the server.cmd (starting point for XL TestView) in the path box as in the picture, and start-up directory will get preset by NSSM. Select then the second tab named Details and set the values as indicated in the following figure:

NSSMInstallerDetails

As you can see, I have chosen a friendlier display name for my service and a meaningful description.

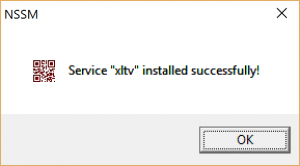
In case you would like to set other parameters, as specific user to run the service or specify dependencies, you can do so in other tabs. Once done it is sufficient to choose Install service and in case everything went fine, you will receive the following message:

NSSMInstalled

You can now check in the Services panel, that a new service is present. In case it hasen’t been started, you can start it and verify that XL TestView is up and running.

Services

Be aware that XL TestView can take a bit to start. I would suggest also to set the startup type to Automatic (Delayed start) and this can be done directly from the service properties.

I you would like to modify the NSSM setup, run nssm edit xltv. In case you would like to remove the service, try nssm remove xltv.

That’s all folks, now also XL TestView runs as a service!

Passing values between TFS 2015 build steps

$
0
0

Introduction

It may happen that you need to pass or make available a value from one build step in your build definition, to all other build steps that are executed after that one. It is not well documented, but there are two ways of passing values in between build steps.
Both of the approaches I am going to illustrate here are based on setting a variable on the task context. The first task can set a variable, and following tasks are able to use the variable. The variable is exposed to the following tasks as an environment variable. When ‘issecret’ option is set to true, the value of the variable will be saved as secret and masked out from log.

In order to test my approaches, I made 4 build tasks, two of them for the first approach and two of them for the second one. They look something like this:

task-1-set

You can download all of the examples here.

Task Logging Command

Build task context supports several types of logging commands. Logging command are a facility available in the run context of the build engine and do allow us to perform some particular actions. A full list of available logging commands is available here. Be aware that some of them are only available since a certain version of the build agent, and before using them check the minimum agent version for clarity, eventually limit your build task to the indicated version.
In our example, I will use a variable provided as a parameter to my task with a value set from the UI, print the value out and store it in the task context. This will be my build task called task1. Once I set the task manifest correctly, I will upload it to my on-premise TFS (it will also work on VSTS/VSO). Let’s check the code.

Write-Output "Message is: $msg"
Write-Output ("##vso[task.setvariable variable=task1Msg;]$msg")

Now, I will create another task and call it task2. This task will try to retrieve the value from the task context, then print the value out. Following is the code I’m using.

$task1Msg = $env:task1Msg

if ($task1Msg)
{
	Write-Output "Value of the message is set and equals to $task1Msg"
}
else
{
	Write-Output "Value of the message is not set."
}

You can find all of the examples I’m using available for download here.

If you now set your build definition with tasks task1 and task2, you will see that based on what you set as a Message in task1, will be visualized in the console by the task2.

task-1-2-run

Set-TaskVariable and Get-TaskVariable cmdlets

The same result can be achieved by using some cmdlets that are made available by the build execution context. We are going to create a task called task3 which will have the same functionality as task1, but it will use a different approach to achieve the same. Let’s check the code:

Import-Module "Microsoft.TeamFoundation.DistributedTask.Task.Common"
    
Set-TaskVariable "task1Msg" $msg

As you can see we are importing modules from a specific library called Microsoft.TeamFoundation.DistributedTask.Task.Common. You can read more about the available modules and exposed cmdlets in my post called Available modules for TFS 2015 build tasks.
After that we are able to invoke the Set-TaskVariable cmdlet and pass the variable name and value as parameters. This will do the job.

In order to retrieve task we need to import another module which is Microsoft.TeamFoundation.DistributedTask.Task.Internal. Although those are quite connected actions, for some reason Microsoft decided to package them in two different libraries. We are going to retrieve our variable value in the following way:

Import-Module "Microsoft.TeamFoundation.DistributedTask.Task.Internal"

$task1Msg = Get-TaskVariable $distributedTaskContext "task1Msg"

if ($task1Msg)
{
	Write-Output "Value of the message is set and equals to $task1Msg"
}
else
{
	Write-Output "Value of the message is not set."
}

As you can see we are invoking the Get-TaskVariable cmdlet with two parameters. First one is the task context. As for other things, build execution context will be populated with a variable called distributedTaskContext which is of type Microsoft.TeamFoundation.DistributedTask.Agent.Worker.Common.TaskContext and beside other exposes information like ScopeId, RootFolder, ScopeType, etc. Second parameter is the name of the variable we would like to retrieve.

The result still stays the same as you can see from the following screenshot:

task-3-4-run

Conclusion

Both approaches will get the job done. It is on you to choose the preferred way of storing and retrieving values. A mix of both also works. You need to experiment a bit with the build task context and see what works for you the best. Be aware that this is valid at the moment I’m writing this, and it is working with TFS 2015, TFS 2015.1 and with VSTS as of 2016-02-19. Seems however that in the near future all of this will be heavily refactored by Microsoft, then my guide will not be relevant anymore.

Stay tuned!

XL Deploy and TFS 2015 – Building, Importing and Deploying Packages

$
0
0

Recently XebiaLabs released a build task for Microsoft Visual Studio Team Services (VSTS) and Team Foundation Server (TFS) 2015 that facilitates the integration of the vNext build pipeline with their product, XL Deploy. The new build task is capable of creating a deployment archive (DAR package), importing it to an instance of XL Deploy, and eventually, if requested, triggering the deployment of the newly added package. It also contains some other interesting options that will ease the process of versioning the deployment package.

In the following post I will show you how to build an ASP.NET MVC application, create the deployment package, and deploy it via XL Deploy. Let’s start.

Prerequisites

Before we start, make sure that you have all of the necessary items in place. First of all, your build agent needs to be capable of building your application. In the case of on-premises TFS 2015, this means that you need to have installed Visual Studio on your build server.

You also need to install the XL Deploy build task; if you haven’t done so already, refer to Install the XL Deploy build task. As a prerequisite for the XL Deploy build task, your XL Deploy instance needs to be of version 5.0.0 or later; earlier versions are not supported.

Once you ensure that these criteria are met, you can continue reading.

Building your web application

First things first. Create a new empty build definition in your project. If you are not familiar with how to do this, refer to the MSDN article Create a build definition.

Set the repository mappings accordingly before proceeding any further; again, refer to the MSDN article Specify the repository for more information about doing so. For this example I am going to use TFVC; however, all of the techniques I am going to describe do work also with Git repository.

Now you can specify the necessary build steps to compile and publish the web application.

Add a Visual Studio Build build task.

add-task-vsb

Once added, you need to set the necessary parameters. The first mandatory setting is the path to the solution file in source control. Click the button with three dots and locate your solution file in the version control tree. Once found and confirmed, the Solution box will be populated with the correct path. In my case, that is $/XL Deploy Showcase/AwesomeWebApp/AwesomeWebApp.sln. This is the solution that will be built in the build definition.

Next you need to use the MSBuild Arguments setting to indicate that all of the built items should be delivered in the build staging directory. This is an important step because when the XL Deploy build task starts creating the deployment archive (DAR package), it will search for items to include in it, starting from this directory (considering the build staging directory as root). That’s why I am going to set MSBuild Arguments to /p:OutDir=$(build.stagingDirectory). This is a common way for MSBuild to pass a parameter; I’m using a variable that will resolve in a specific path when the build is run. A list of available variables and their usage is explained in the MSDN article Use variables. For now, I will not change any other setting. Make sure that Restore NuGet Packages is selected and that the correct version of Visual Studio is listed.

vsbuild-task

Save the build definition. Enter a relevant name and optionally set the comment.

save-definition

Now, you can test the build. Queue a new build and check the results. If everything went well, you will get a ‘green’ build.

first-build

Now you are sure that the project builds correctly and we can continue with our next task, which is deploying the application via XL Deploy.

You can find more information about build steps on MSDN at Specify your build steps.

XL Deploy build task

In order to continue, you need to have a valid XL Deploy manifest file checked in to our source control. You can read about creating a manifest file at XL Deploy manifest format. I checked in the following manifest:

<?xml version="1.0" encoding="utf-8"?>
<udm.DeploymentPackage version="1.0.0.0" application="AwesomeWebApp">
  <deployables>
	<iis.WebContent name="website-files" file="_PublishedWebsites\AwesomeWebApp">
	  <targetPath>C:\inetpub\AwesomeWebApp</targetPath>
	</iis.WebContent>
	<iis.ApplicationPoolSpec name="AwesomeWebApp">
	  <managedRuntimeVersion>v4.0</managedRuntimeVersion>
	</iis.ApplicationPoolSpec>
	<iis.WebsiteSpec name="AwesomeWebApp-website">
	  <websiteName>AwesomeWebApp</websiteName>
	  <physicalPath>C:\inetpub\AwesomeWebApp</physicalPath>
	  <applicationPoolName>AwesomeWebApp</applicationPoolName>
	  <bindings>
	<iis.WebsiteBindingSpec name="AwesomeWebApp/8088">
	  <port>8088</port>
	</iis.WebsiteBindingSpec>
	  </bindings>
	</iis.WebsiteSpec>
  </deployables>
</udm.DeploymentPackage>

As you can see, I specified the required IIS application pool, a web site, and, most importantly, WebContent. The WebContent element indicates that the files that do represent the web site.

An attribute called file is present on the deployable element iis.WebContent. This attribute is very important, as it will guide the build task in creating the deployment archive. A relative path is set as the value and indicates the folder that needs to be included in the DAR package. This relative path assumes that the root folder is the build staging directory; it will search this directory for the folders specified here. If they are not present, packaging will fail. Now you understand why I delivered the build output in the staging folder. Although this behavior can be overridden in the advanced settings of the XL Deploy build task, I would advise you not to change it if it is not necessary and until you became confident and sufficiently experienced with TFS 2015 builds.

The manifest file also indicates that I expect MSBuild to package the web application under a default folder called _PublishedWebsites. This is standard behavior for MSBuild.

After the manifest file is correctly checked in, you can continue and edit the recently created build definition by adding another build step. This time, go to the Deploy group and select XL Deploy.

add-task-xld

The first mandatory parameter that you need to set is the path to the manifest file. As you did previously for the solution file, click the button with three dots and select the manifest file in source control. In my case, that will be $/XL Deploy Showcase/AwesomeWebApp/deployit-manifest.xml.

Secondly, you need to set the endpoint, which is a definition of the URL and credentials for the XL Deploy server that you intend to use in this deployment. If no XL Deploy endpoints are defined, click Manage and define one. For information about doing so, refer to Add an endpoint in Team Foundation Server 2015. After you are done, click Refresh and your newly added endpoint will appear.

Versioning the package

As you can see, there is a Version option available on the XL Deploy build task. If selected, the deployment package version will be set to the build number format during the process. The build number format is a value that you can set in the General tab of the build definition.

When composing the build number, you can choose between constants and special tokens that are available for that purpose. In Specify general build definition settings, you can read about the available tokens and ways of setting the build number format.

If you are using a different pattern for versioning your deployment package and your build number format has a different use, you can override this behavior by setting a custom value in Version value override parameter under Advanced options.

For this example, I will set this option and then set the build number format to a simple ‘1.1.1$(Rev:.r)’.

Automated deployment

You have the option to automatically deploy the newly imported package to the environment of your choice. If you select the Deploy check-box on the XL Deploy build task, a new field called Target Environment will be available. Here, you need to specify the fully qualified name of the environment defined in XL Deploy. In my case, it is called Test. You can also allow the deployment to be rolled back in case of failure by selecting Rollback on deployment failure.

Note that this requires that you have correctly defined the environment in XL Deploy, with the relevant infrastructure and components. For more information, refer to Create an environment in XL Deploy.

Ready to roll

After you set all of the parameters and save the build definition, you are ready to trigger the new build. Make sure that you set all of the necessary parameters as shown in the picture.

xld-task

You can now trigger the new build. In the build console you should now see the information relevant to the process of creating and versioning the package.

final-build

In case of problems, you can add a new build definition variable named system.debug and set the value to true. Then, in the build log, you will see more detailed messages about all of the actions preformed by the tasks (note that this is not shown in the console). It should be sufficient to diagnose the issue.

Conclusions

This was a small practical example about taking advantage of the new XL Deploy build task. I haven’t covered all of the available options; you can read more about them at Introduction to the Team Foundation Server 2015 plugin. However, this example is sufficient to get started. You can combine other build tasks in your build definition with the XL Deploy build task; but it is important that you invoke the XL Deploy build task after all of the elements that will compose your deployment package are available.

Detailing TFS configuration – IIS

$
0
0

One of the most annoying things when it comes to accessing the TFS portal is that you need to specify the context path /tfs. In other words, if you just type http://mytfs.com:8080 you will not get redirected to your application, which has the full path of http://mytfs.com:8080/tfs. Same if SSL is used, often and by default you are obliged to indicate the https or even worst in case SSL is made mandatory, you will get a nice 403.

Well this is a bit of shame. Many people standing behind and supporting TFS are often not keen to set this details up. This can be because of the leak of knowledge, “fear” of the unknown, negligence, character. It is such a simple operation that shows that you do care. So let’s check a couple of things you can do in order to make this happen.

The Beauty Is In the Details

There are several improvements that we can make on IIS that is running our TFS instance. I will try to make you a couple of suggestion, if some of them can’t apply on your case by any reason, it is not mandatory to set them. Following are just suggestions on how to tide up your default TFS installation.

The cleanup

Often I do see on the IIS of TFS server a Default Web Site. In 99,9% of the cases it is not used. If that is also your case (running only TFS on that machine) you are safe to remove it.

iis-initial

As you can see, aside of the Team Foundation Server site, there is the Default Web Site in my case. I will just right click it and choose Remove.

remove-default

After you removed the Default Web Site, you can do the same for all unused Application pools.

app-pool-remove

As from the image, get to the Application Pools and remove all of the pools which name doesn’t start on per Microsoft Team Foundation.

The redirect

It will be handy that in the browser you do not need to type over and over the context path of /tfs. In order to set this up we can leverage the Http Redirect feature of IIS. By default it is not installed thus we will need to add it. Open Server Manager and choose Manage -> Add Roles and Features.

server-manager-add-role

Now get to the Server Roles and under Web Server (IIS) – Web Server – Common HTTP Features select the HTTP Redirects.

add-roles-http-redirection

Conclude the installation procedure and restart the IIS Manager.
Now after selecting your Team Foundation Server site, you will see the HTTP Redirect feature.

http-redirect

Select this option by double clicking it and enable the Redirect Requests as set on the following image.

set-redirect

In the text box you will need to enter the full URL of your TFS comprehensive of the context path. Now, once the IIS recieves a request towards the root of your application it will redirect it towards your TFS application, called tfs. Make sure before Applying these settings that the Only redirect requests to content in this directory (not subdirectories) is selected, otherwise all of your calls will result in an recursive redirect. Apply these settings and try calling your server without the context path. If you are monitoring your web calls with tools like Fiddler, you will see that your first call is redirected by the server towards the URL we specified under the Redirect request option.

This technique is only working with your portal and browser. You will always need to specify the full URL in your Visual Studio or any other tooling that requires the TFS path. This is because they are not able to understand the redirect and act in the way your browser does. Keep this in mind.

Connecting people

By default TFS will set it’s default port to 8080. Again if it is the only application on your server it is a shame being in need to specify the port for the each call. What about letting it replay also to a port 80, which is the default http port and doesn’t need to be specified?
Welcome bindings. Select your Team Foundation Server and chose in between the available actions the one called Bindings. You will be presented with the following screen.

site-bindings

Make sure that aside the http binding to port 8080 there is the one that binds the requests to the port 80. If it is not there, first edit the current binding of port 8080 and change it to port 80. Then add a new one and make it replay to port 8080. Click close and try calling your TFS without specifying the port 8080. Your IIS should replay correctly.

The result of this change will work with all of the tooling accessing TFS, like Visual Studio. You are now not anymore obliged to specify the port 8080.

Talking under four eyes

It may be a good idea or a necessity to use transport layer security. Enabling HTTPS on you web site is fairly simple. How to create and import a certificate is out of the scope of this post. Given that you have correctly imported a certificate into the IIS certificate store, open the site binding and add a new one.

add-site-binding-ssl

As a type choose https and select the certificate that you intend to use for TFS.
From now on, you can point to https://yourTFS/tfs and you will be using a secure connection. In case you omit the context path, you will end up on a non protected connection. To sort that out, change your redirect and make it point to the secure version of link.

Also you may desire to make the HTTP mandatory. If that is the case, you could simply enable Require SSL option under SSL Settings for your TFS Web Site.

require-ssl

In you do so, pointing to a non SSL version of your site will result in a 403 Forbidden response. Although it is self explanatory as a message it is not nicely handled. It would be nicer if you would be redirected to the https version of your request. For that, we can use a trick. Open Error pages pane and edit the 403 page.

custom-error-403

Set the Respond with a 302 redirect and set your desired https URL. Now, instead of showing a Forbidden message, your browser will be automatically redirected to a correct link.

Conclusion

I showed you a couple of tips on how to set you TFS IIS in order to be more friendly in responses and to remove the unnecessary things. There are other tips I may have on this argument, however they do fall in a maintenance domain, such as managing log files, etc. Soon I will publish a separate, more detailed blog post about this argument.

Cheers

TFS 2015 behind a proxy

$
0
0

In many enterprise realities it is quite common that all of the internet access is made via a proxy server. Recently I wrote a post about a Tough life behind a proxy, you may check that for some of my rants and tips. What if your servers do also require internet access? Although it may seem it doesn’t, TFS 2015 has a need to access the web. Not having the access to web will not compromise any of it’s core functionality, however it will continue logging an error in the event log. It has to do with the News panel that is shown (or not) on your main portal page. As you can see on the following screenshot next to the Recent team rooms panel, on the right side, the usual News panel is not shown.

before

If you check your event log, you will probably find the following error:

System.Net.WebException: Unable to connect to the remote server ---> System.Net.Sockets.SocketException: A connection attempt failed because the connected party did not properly respond after a period of time, or established connection failed because connected host has failed to respond 23.198.69.66:80
       at System.Net.Sockets.Socket.DoConnect(EndPoint endPointSnapshot, SocketAddress socketAddress)
       at System.Net.ServicePoint.ConnectSocketInternal(Boolean connectFailure, Socket s4, Socket s6, Socket& socket, IPAddress& address, ConnectSocketState state, IAsyncResult asyncResult, Exception& exception)
       --- End of inner exception stack trace ---
       at System.Net.HttpWebRequest.GetResponse()
       at System.Xml.XmlDownloadManager.GetNonFileStream(Uri uri, ICredentials credentials, IWebProxy proxy, RequestCachePolicy cachePolicy)
       at System.Xml.XmlUrlResolver.GetEntity(Uri absoluteUri, String role, Type ofObjectToReturn)
       at System.Xml.XmlTextReaderImpl.FinishInitUriString()
       at System.Xml.XmlTextReaderImpl..ctor(String uriStr, XmlReaderSettings settings, XmlParserContext context, XmlResolver uriResolver)
       at System.Xml.XmlReaderSettings.CreateReader(String inputUri, XmlParserContext inputContext)
       at Microsoft.TeamFoundation.Server.WebAccess.Controllers.ApiCommonController.GetNews(Int32 maxCount)

This is how it looks like in the log:

Event

It is pretty clear that the action called GetNews on the ApiCommonControler was unable to fulfill the Http request it made. This is because my TFS is behind a proxy server for what concerns the web access.
In order to set the access for the TFS application via a proxy, you need to locate the correct web.config file, which in may case is present in C:\Program Files\Microsoft Team Foundation Server 14.0\Application Tier\Web Services.
What you will need to do is to edit that file and under the system.net section add the following:

<system.net>
    <defaultProxy>
    	<proxy usesystemdefault="True" proxyaddress="http://swg.eu.myproxy.com:8080" bypassonlocal="True"/>
    </defaultProxy>
</system.net>

Make sure the correct proxyaddress is set and give your TFS main portal page a go. If all went as expected and your settings are valid, you should see the following:

after

That’s it. It may not be an essential setting, however it is nice to see that there are no errors in the event log and that your users do get a full experience.

Cheers

Querying XL TestView via PowerShell

$
0
0

Since the version 1.4.0 XL TestView started exposing several functionality via REST API. This is inline with other XebiaLabs products and it is a welcome characteristic. If you tried invoking a web request towards your XL TestView server, you may be surprised that the authentication fails (no matter the usual technique of passing the credentials). This is due to the fact that XL TestView doesn’t support the challenge-response authentication mechanism.

An example:

$credential = Get-Credential
$server = "http://xld.westeurope.cloudapp.azure.com:6516/api/v1"
    
Invoke-WebRequest $server/projects -Credential $credential

After executing this code you will receive a 401 Unauthorized response with Jetty (XL TestView web server) stating “Full authentication is required to access this resource”.

ps401

Invoke-WebRequest cmdlet doesn’t send the authentication headers with the first call and it expects a
401 response with the correct WWW-Authenticate header as described in RFC2617. Then, based on the authentication schema token received, prepares a call with a proper authentication method if supported.
Unfortunately this behavior is not supported by XL TestView. Still, do not desperate, there is a way to interact with XL TestView via your PowerShell scripts.

Authentication header

In order to authenticate on the first call, we need to provide the authentication header manually and include it in our web request. Knowing that XL TestView uses the Basic authentication we need to prepare the necessary for this operation. First of all we need to create the value that we are going to provide for the header called Authorization. It is following the well know standard described in RFC1945 which states that the username and password are combined into a string separated by a colon, e.g.: username:password, that the resulting string is encoded using the RFC2045-MIME variant of Base64, except not limited to 76 char/line and that the authorization method and a space i.e. “Basic ” is then put before the encoded string.

In order to create such a header I created a cmdlet that sums those steps.

function Get-AuthorizationHeader
{
	[CmdletBinding()]
	param
	(
	[string][parameter(Mandatory = $true)]$Username,
	[string][parameter(Mandatory = $true)]$Password
	)
	BEGIN { }
	PROCESS
	{
		$base64AuthInfo = [Convert]::ToBase64String([Text.Encoding]::ASCII.GetBytes(("{0}:{1}" -f $UserName, $Password)))
		
		return @{Authorization=("Basic {0}" -f $base64AuthInfo)}
	}
	END { }
}

Invoking this cmdlet and providing the requested username and password, will return the requested header object that we can include in our call towards the XL TestView REST API.

Invoking the web request

Once our cmdlet for the necessary authentication header is set, we can invoke our call simply as follows:

$Username = "username"
$Password = "password"
Invoke-WebRequest $url -Headers (Get-AuthorizationHeader $Username $Password)

You can see that we are not telling the Invoke-WebRequest to used credentials to authenticate, however we are specifying the necessary header for the authentication. This will pass all of the necessary on the first request towards XL TestView and our call should succeed.

Be aware that with the Basic authentication the credentials are passed in clear (encoded as base64 string) and an encrypted connection is advised (https).

This technique is valid for all of the services that do not use challenge-response authentication mechanism, not only XL TestView.


Securing Nexus Repository Manager OSS

$
0
0

Recently one of my articles got published on SonaType web site. It is based on my blog post Nexus Repository Manager OSS as Nuget server, which, after reviewing it for SonaType blog, somehow didn’t seemed complete. Thus, I decided to add an extra chapter about the security which I would like to share with you, also on my personal blog, here.

Security

I suppose that your computers are part of an Active Directory domain. I will propose here a setup to make your new Nexus instance dialogue with your domain controller when it comes to authenticating users. Why? Well, uploading packages to the hosted repository requires an API-key and it is assigned on per user basis. If you wish that your users (services) to be distinguished and limit some of them, you would need to setup the authentication and roles correctly. You could do this by simply using Nexus internal database, however, as we all know, adding users manually and creating another identity, from convenience and maintenance prospective is not recommendable. Not to speak about the security implications.

Setting up LDAP connection

In the left-hand main menu panel expand the security group and select the LDAP Configuration option. A new tab will open and you will be presented with a long list of parameters:

ldap-configuration

We are going to analyze them one by one and explain the values you do need to enter in order to make this connection work.

Protocol
Here you have two choices Lightweight Directory Access Protocol and the Lightweight Directory Access Protocol over SSL. Probably you are going to use just a simple LDAP protocol and not the

Hostname
The hostname or IP address of the LDAP server. Simply add the FQDN towards your domain controller.

Port
The port on which the LDAP server is listening. Port 389 is the default port for the ldap protocol, and port 636 is the default port for the ldaps.
If you have a multi domain, distributed Active Directory forest, you should connect to the Active Directory through port 3268. Connecting directly to port 389 might lead to errors. Port 3268 exposes Global Catalog Server that exposes the distributed data. The SSL equivalent connection port is 3269.

Search Base
The search base is the Distinguished Name (DN) to be appended to the LDAP query. The search base usually corresponds to the domain name of an organization. For example, the search base on my test domain server could be dc=maio,dc=local.

Authentication Method
Simple authentication is what we are going to use in first instance for our Active Directory authentication. It is not recommended for production deployments not using the secure ldaps protocol as it sends a clear-text password over the network. You can change

Username
For the LDAP service to establish the communication with the AD server, a valid account is necessary. Usually you will create a service account in your AD for this purpose only.

Password
Password for the above mentioned account.

This is the first part of configuration. Now we need to check if what we entered is valid and if the connection can be established.
Click on Check Authentication button and if the configuration is valid, you should get the following message:

authentication-test

Base DN
You should indicate in which organizational unit Nexus should search for user accounts. By default it can equal to ‘cn=users’ however if you store your user accounts in a different OU, please specify the full path. An example, if you created an OU at the root level called MyBusiness then an OU called Users, you will need to specify the following value as base DN, ‘OU=Users,OU=MyBusiness’.

User Subtree
This needs to be check only if you are having other OU’s, under the one specified in Base DN, in which users are organized. If that is not the case, you can leave it unchecked.

Object Class
For AD it needs to be set yo ‘user’.

User ID Attribute
In the MS AD implementation this value equals to sAMAccountName

Real Name Attribute
You can set this to ‘givenName’ attribute, or simply to cn if givenName is not used during the user creation.

E-Mail Attribute
This attribute should map to ‘mail’

Group Type
Group Type needs to be set to Dynamic Groups.

Member Of Attribute
In case of MS AD this equals to ‘memberOf’.

Now that we have set all of the relevant values, we can ask Nexus OSS to give us a preview of retrieved accounts and mappings to make sure everything is set up correctly. Click on the Check User Mapping button and you should see a preview of the retrieved values and how they are mapped into Nexus OSS. If everything looks fine , save your configuration.

Once the configuration is persisted, the last thing to do is to let Nexus know that you would like to use this new setup for the authentication. This is done by enabling the LDAP Authentication Realm.

In the left-hand main menu panel, from the administration group, choose Server. In the nexus tab that opens, go to the security settings

selected-realms

You will find the OSS LDAP Authentication Realm in the group shown on the right side, called Available Realms. Move it to Selected realms (as shown in the picture above) and save this settings.

Configuring roles

Now that we are able to authenticate through LDAP (AD) we need to set who can do what. This is when the roles do get handy. I usually create security groups and then associate them to roles as this moves the operations of granting the access rights to merely assigning a user to a group.
You can still associate roles to the user in more or less the same way, however I’m going to show you my favorite approach.

From the left-hand main menu panel, in the Security group, select Roles. A new tab showing a list of roles will appear.

external-role-mapping

Choose Add and then External Role Mapping option. You will then be presented with the following dialog:

map-external-role

As you can see from this screenshot, choose LDAP as Realm and the role (an AD security group to be precise) you wish to map. Be aware that in some cases, not all of the groups will be listed. It is a well know bug. If this is your case, there is a workaround. Add a Nexus Role instead of the External Role Mapping and name the role precisely as your missing group is named. This should do the trick until this issue gets solved.

Once the mapping is added, you will need to assign roles (actual rights) to selected security group.

external-role-mapping

On the Role/Privilege Management bar, choose Add button and select the following roles:

  • Nexus API-Key Access
  • Nexus Deployment Role
  • Repo: All NuGet Repositories (Full Control)
  • Artifact Upload

These set of rights will enable whoever part of that group to login in Nexus OSS, manually upload packages, get the API-Key, and generally to control all NuGet repositories. In other words, a sort of developers role when it comes to NuGet.

When it comes to administrator role, it is sufficient to assign only the Nexus Administrator Role.
At the end of selecting roles, do not forget to click on Save button and persist this configuration.

This two basic profiles should be sufficient to start using Nexus. If further profiles are necessary, check the managing roles guide.

You can now test all of our security setup. Make sure you AD user account is part of the administrative security group that you just mapped to Nexus Administrator Role. Log out and log back in with your domain account. If you succeed to login, congratulations LDAP is set correctly.
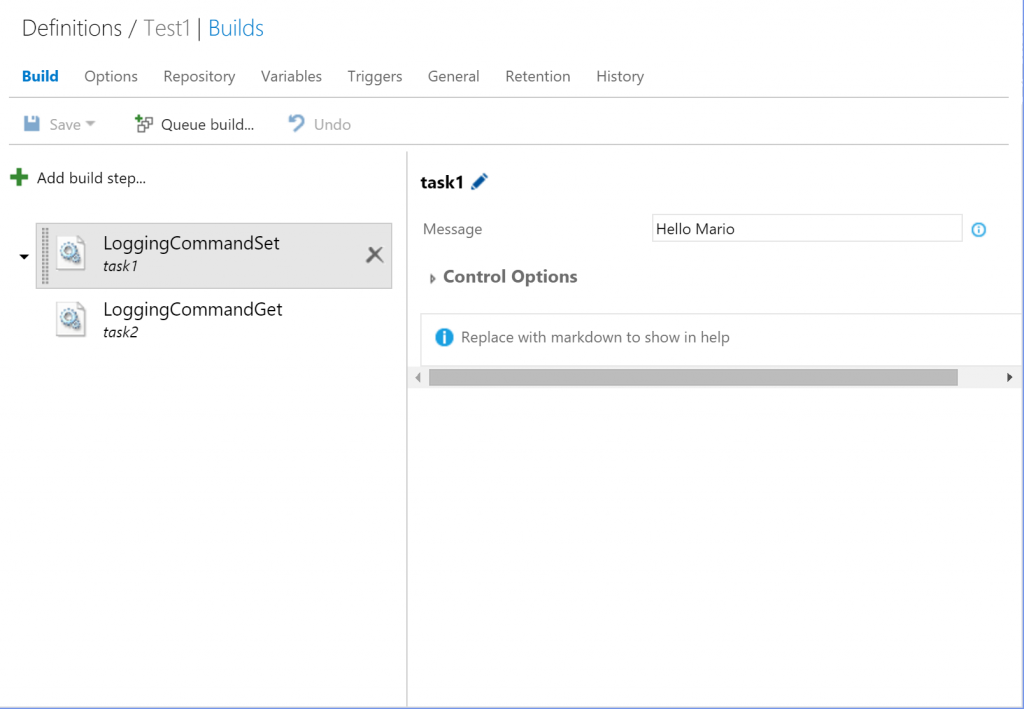
Uploading artifacts into Nexus via PowerShell

$
0
0

It may not be the most common thing, however it may happen that you would need to upload an artifact to a maven repository in Nexus via PowerShell. In order to achieve that, we will use Nexus REST API which for this task requires a multipart/form-data POST to /service/local/artifact/maven/content resource. This is however not a trivial task. It is notoriously difficult to manage a Multipart/form-data standard in PowerShell, as I already described in one of my previous post PowerShell tips and tricks – Multipart/form-data requests. As you can see this type of call is necessary in order to upload an artifact to your Nexus server. I will not get in a details about Multipart/form-data requests and if interested about the details, you can check just mentioned post.

For this purpose I created two cmdlets that will allow me to upload an artifact by supplying GAV parameters or by passing the GAV definition in a POM file. A couple of simple functions do support both of these cmdlets.

GAV definition in a POM file

As the heading suggests, this cmdlet will let you upload your artifact and specify the GAV parameters via a POM file.

function Import-ArtifactPOM()
{
	[CmdletBinding()]
	param
	(
		[string][parameter(Mandatory = $true)][ValidateNotNullOrEmpty()]$EndpointUrl,
		[string][parameter(Mandatory = $true)][ValidateNotNullOrEmpty()]$Repository,
		[string][parameter(Mandatory = $true)][ValidateNotNullOrEmpty()]$PomFilePath,
		[string][parameter(Mandatory = $true)][ValidateNotNullOrEmpty()]$PackagePath,
		[System.Management.Automation.PSCredential][parameter(Mandatory = $true)]$Credential
	)
	BEGIN
	{
		if (-not (Test-Path $PackagePath))
		{
			$errorMessage = ("Package file {0} missing or unable to read." -f $PackagePath)
			$exception =  New-Object System.Exception $errorMessage
			$errorRecord = New-Object System.Management.Automation.ErrorRecord $exception, 'ArtifactUpload', ([System.Management.Automation.ErrorCategory]::InvalidArgument), $PackagePath
			$PSCmdlet.ThrowTerminatingError($errorRecord)
		}
		
		if (-not (Test-Path $PomFilePath))
		{
			$errorMessage = ("POM file {0} missing or unable to read." -f $PomFilePath)
			$exception =  New-Object System.Exception $errorMessage
			$errorRecord = New-Object System.Management.Automation.ErrorRecord $exception, 'ArtifactUpload', ([System.Management.Automation.ErrorCategory]::InvalidArgument), $PomFilePath
			$PSCmdlet.ThrowTerminatingError($errorRecord)
		}

		Add-Type -AssemblyName System.Net.Http
	}
	PROCESS
	{
		$repoContent = CreateStringContent "r" $Repository
		$groupContent = CreateStringContent "hasPom" "true"
		$pomContent = CreateStringContent "file" "$(Get-Content $PomFilePath)" ([system.IO.Path]::GetFileName($PomFilePath)) "text/xml"
		$streamContent = CreateStreamContent $PackagePath

		$content = New-Object -TypeName System.Net.Http.MultipartFormDataContent
		$content.Add($repoContent)
		$content.Add($groupContent)
		$content.Add($pomContent)
		$content.Add($streamContent)

		$httpClientHandler = GetHttpClientHandler $Credential

		return PostArtifact $EndpointUrl $httpClientHandler $content
	}
	END { }
}

In order to invoke this cmdlet you will need to supply the following parameters:

  • EndpointUrl – Address of your Nexus server
  • Repository – Name of your repository in Nexus
  • PomFilePath – Full, literal path pointing to your POM file
  • PackagePath – Full, literal path pointing to your Artifact
  • Credential – Credentials in the form of PSCredential object

I will create a POM file with the following content:

<project>
  <modelVersion>4.0.0</modelVersion>
  <groupId>com.mycompany.app</groupId>
  <artifactId>my-app</artifactId>
  <version>3</version>
</project>

And invoke my cmdlet in the following way:

$server = "http://nexus.maio.com"
$repoName = "maven"
$pomFile = "C:\Users\majcicam\Desktop\pom.xml"
$package = "C:\Users\majcicam\Desktop\junit-4.12.jar"
$credential = Get-Credential

Import-ArtifactPOM $server $repoName $pomFile $package $credential

If everything is correctly setup, you will be first asked to provide the credentials, then the upload will start. If it succeeds, you will receive back a string like this:

{"groupId":"com.mycompany.app","artifactId":"my-app","version":"3","packaging":"jar"}

It is a json representation of the information about imported package.

Manually supplying GAV parameters

The other cmdlet is based on a similar principle, however it doesn’t require a POM file to be passed in, instead it let you provide GAV values as parameter to the call.

function Import-ArtifactGAV()
{
	[CmdletBinding()]
	param
	(
		[string][parameter(Mandatory = $true)][ValidateNotNullOrEmpty()]$EndpointUrl,
		[string][parameter(Mandatory = $true)][ValidateNotNullOrEmpty()]$Repository,
		[string][parameter(Mandatory = $true)][ValidateNotNullOrEmpty()]$Group,
		[string][parameter(Mandatory = $true)][ValidateNotNullOrEmpty()]$Artifact,
		[string][parameter(Mandatory = $true)][ValidateNotNullOrEmpty()]$Version,
		[string][parameter(Mandatory = $true)][ValidateNotNullOrEmpty()]$Packaging,
		[string][parameter(Mandatory = $true)][ValidateNotNullOrEmpty()]$PackagePath,
		[System.Management.Automation.PSCredential][parameter(Mandatory = $true)]$Credential
	)
	BEGIN
	{
		if (-not (Test-Path $PackagePath))
		{
			$errorMessage = ("Package file {0} missing or unable to read." -f $packagePath)
			$exception =  New-Object System.Exception $errorMessage
			$errorRecord = New-Object System.Management.Automation.ErrorRecord $exception, 'XLDPkgUpload', ([System.Management.Automation.ErrorCategory]::InvalidArgument), $packagePath
			$PSCmdlet.ThrowTerminatingError($errorRecord)
		}

		Add-Type -AssemblyName System.Net.Http
	}
	PROCESS
	{
		$repoContent = CreateStringContent "r" $Repository
		$groupContent = CreateStringContent "g" $Group
		$artifactContent = CreateStringContent "a" $Artifact
		$versionContent = CreateStringContent "v" $Version
		$packagingContent = CreateStringContent "p" $Packaging
		$streamContent = CreateStreamContent $PackagePath

		$content = New-Object -TypeName System.Net.Http.MultipartFormDataContent
		$content.Add($repoContent)
		$content.Add($groupContent)
		$content.Add($artifactContent)
		$content.Add($versionContent)
		$content.Add($packagingContent)
		$content.Add($streamContent)

		$httpClientHandler = GetHttpClientHandler $Credential

		return PostArtifact $EndpointUrl $httpClientHandler $content
	}
	END { }
}

In order to invoke this cmdlet you will need to supply the following parameters:

  • EndpointUrl – Address of your Nexus server
  • Repository – Name of your repository in Nexus
  • Group – Group Id
  • Artifact – Maven artifact Id
  • Version – Artifact version
  • Packaging – Packaging type (at ex. jar, war, ear, rar, etc.)
  • PackagePath – Full, literal path pointing to your Artifact
  • Credential – Credentials in the form of PSCredential object

An example of invocation:

$server = "http://nexus.maio.com"
$repoName = "maven"
$group = "com.test"
$artifact = "project"
$version = "2.4"
$packaging = "jar"
$package = "C:\Users\majcicam\Desktop\junit-4.12.jar"
$credential = Get-Credential

Import-ArtifactGAV $server $repoName $group $artifact $version $packaging $package $credential

If all goes as expected you will again receive a response confirming the imported values.

{"groupId":"com.test","artifactId":"project","version":"2.4","packaging":"jar"}

Supporting functions

As you could see, my cmdlets relay on a couple of functions. They are essential in this process so I will analyse them one by one.

function CreateStringContent()
{
	param
	(
		[string][parameter(Mandatory = $true)][ValidateNotNullOrEmpty()]$Name,
		[string][parameter(Mandatory = $true)][ValidateNotNullOrEmpty()]$Value,
		[string]$FileName,
		[string]$MediaTypeHeaderValue
	)
		$contentDispositionHeaderValue = New-Object -TypeName  System.Net.Http.Headers.ContentDispositionHeaderValue -ArgumentList @("form-data")
		$contentDispositionHeaderValue.Name = $Name

		if ($FileName)
		{
			$contentDispositionHeaderValue.FileName = $FileName
		}
		
		$content = New-Object -TypeName System.Net.Http.StringContent -ArgumentList @($Value)
		$content.Headers.ContentDisposition = $contentDispositionHeaderValue

		if ($MediaTypeHeaderValue)
		{
			$content.Headers.ContentType = New-Object -TypeName System.Net.Http.Headers.MediaTypeHeaderValue $MediaTypeHeaderValue
		}

		return $content
}

function CreateStreamContent()
{
	param
	(
		[string][parameter(Mandatory = $true)][ValidateNotNullOrEmpty()]$PackagePath
	)
		$packageFileStream = New-Object -TypeName System.IO.FileStream -ArgumentList @($PackagePath, [System.IO.FileMode]::Open)
		
		$contentDispositionHeaderValue = New-Object -TypeName  System.Net.Http.Headers.ContentDispositionHeaderValue "form-data"
		$contentDispositionHeaderValue.Name = "file"
		$contentDispositionHeaderValue.FileName = Split-Path $packagePath -leaf

		$streamContent = New-Object -TypeName System.Net.Http.StreamContent $packageFileStream
		$streamContent.Headers.ContentDisposition = $contentDispositionHeaderValue
		$streamContent.Headers.ContentType = New-Object -TypeName System.Net.Http.Headers.MediaTypeHeaderValue "application/octet-stream"

		return $streamContent
}

First two functions are there to create a correct HTTP content. Each content object we create will correspond to a content-disposition header. The first function will return a string type values for the just mentioned header, meanwhile the Stream content will return a stream that will be consumed later on, having as a value octet-stream representation of our artifact.

GetHttpClientHandler function is a helper that will create the right http client handler that contains the credentials to be used for our call.

function GetHttpClientHandler()
{
	param
	(
		[System.Management.Automation.PSCredential][parameter(Mandatory = $true)]$Credential
	)

	$networkCredential = New-Object -TypeName System.Net.NetworkCredential -ArgumentList @($Credential.UserName, $Credential.Password)
	$httpClientHandler = New-Object -TypeName System.Net.Http.HttpClientHandler
	$httpClientHandler.Credentials = $networkCredential

	return $httpClientHandler
}

Last but not least, a function that actually invokes the post call to our server.

function PostArtifact()
{
	param
	(
		[string][parameter(Mandatory = $true)]$EndpointUrl,
		[System.Net.Http.HttpClientHandler][parameter(Mandatory = $true)]$Handler,
		[System.Net.Http.HttpContent][parameter(Mandatory = $true)]$Content
	)

	$httpClient = New-Object -TypeName System.Net.Http.Httpclient $Handler

	try
	{
		$response = $httpClient.PostAsync("$EndpointUrl/service/local/artifact/maven/content", $Content).Result

		if (!$response.IsSuccessStatusCode)
		{
			$responseBody = $response.Content.ReadAsStringAsync().Result
			$errorMessage = "Status code {0}. Reason {1}. Server reported the following message: {2}." -f $response.StatusCode, $response.ReasonPhrase, $responseBody

			throw [System.Net.Http.HttpRequestException] $errorMessage
		}

		return $response.Content.ReadAsStringAsync().Result
	}
	catch [Exception]
	{
		$PSCmdlet.ThrowTerminatingError($_)
	}
	finally
	{
		if($null -ne $httpClient)
		{
			$httpClient.Dispose()
		}

		if($null -ne $response)
		{
			$response.Dispose()
		}
	}
}

This is all the necessary to upload an artifact to our Nexus server. You can find the just show scripts also on GitHub in the following repository tfs-build-tasks. Further information about programtically uploading artifacts into Nexus can be found in the following post, How can I programatically upload an artifact into Nexus?.

Visual Studio Code behind a proxy

$
0
0

This post is kind of a continuation of Tough life behind a proxy series. This time is the moment of Visual Studio Code. This application does require the web access when it come to plugin installation. If you are behind a proxy, it will not be the easiest thing to achieve.

To set the proxy in Visual Studio Code you need to edit the User Settings. You can do so by opening them from the Preference menu:

user_settings

Once you open it you will be presented with a screen showing the default settings and your user settings file that does override the default settings:

override

Now you can enter the following:

// Place your settings in this file to overwrite the default settings
{
 "http.proxy": "http://my.proxy.address:8080",
 "https.proxy": "http://my.proxy.address:8080",
 "http.proxyStrictSSL": false
}

Some of these information is quite easy to retrieve on interweb, however often they do not mention https and disabling strict SSL. In order to install your extension this is a necessary setting.
Make sure you have the latest version of Visual Studio Code installed before testing this as in some older versions this was not supported.

Save your settings and restart Visual Studio Code. Try now installing an extension, it should be a success.
If you are unaware on how to install an extension in Visual Studio Code, you can find more about this argument in the following blog post Announcing PowerShell language support for Visual Studio Code and more! under “Installing the extension” paragraph. To check the available extensions, please visit Visual Studio Marketplace.

Cheers

SonarQube on Windows and MS SQL

$
0
0

Introduction

In the following post we will see what is necessary to install and configure SonarQube 5.4. We will also see how to setup some basic security concerns by making our SonarQube part of our LDAP infrastructure and map security groups to roles.
I’m sure that there are plenty of guides out there, but what I found most annoying meanwhile reading some of them, is that all of them do give several things for granted. Also the information is segmented and not easy to find. I will try in this post to cover even the basic steps that can save you hours of struggling. I’m going to install SonarQube on Windows platform using MS SQL as my database of choice. Both of these services in my case are going to reside on the same machine, but nothing limits you to use multiple machines for your setup.
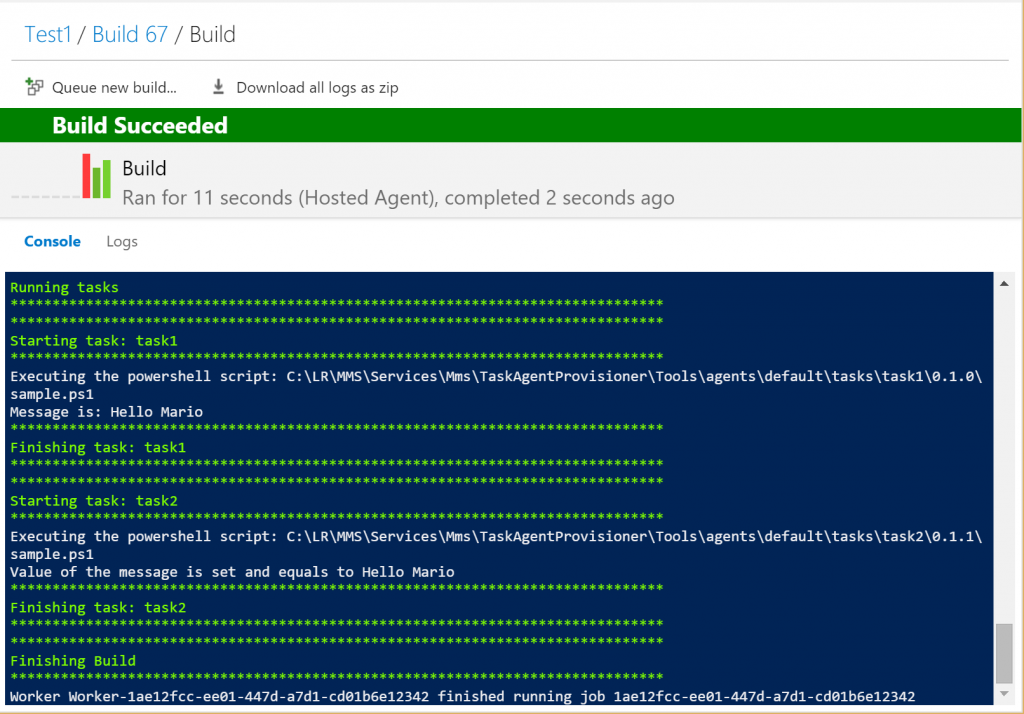
Prerequisites

Java runtime is the main prerequisite. Although it works with Java 7, my advice is to install and use JDK 8. At the moment of writing the latest version for my platform is jdk-8u77-windows-x64.exe.
For what concerns MS SQL versions, 2008, 2012 and 2014 are supported. Also the SQL Express is supported. Your SQL server needs to support case-sensitive (CS) and accent-sensitive (AS) collation.

Installing the database

After you installed your MS SQL version of choice, you need to create a database. Add a new database and name it SonarQube.

new-database

Now the important step. In the Options page you need to specify the right collation. It needs to be one of the case-sensitive (CS) and accent-sensitive (AS) collations. In my case I will go for SQL_Latin1_General_CP1_CS_AS.

new-database-options

Once that is set, click OK and create the new database.

After the database is created, we need to make sure that the TCP/IP protocol is enabled for our SQL instance. Open the Sql Server Configuration Manager and, in the console pane, expand SQL Server Network Configuration. Choose the Protocols for your instance. In the details pane, right-click TCP/IP, and then click Enable. Once done, restart the service. A detailed guide is available on Technet at Enable TCP/IP Network Protocol for SQL Server.

conf-manager

Last but not least, make sure that SQL Server Browser service is running. Often it is disabled by default, however for the JDBC driver to work, it needs to be enabled and running. Open the Services management console and find the Service called SQL Server Browser. If disabled, enable it and start the service.

services

That’s all for now for what database concerns.

Installing SonarQube

Before we start, make sure that the latest JDK is installed, then download the SonarQube installation file from SonarQube website. For this demo I will be using the latest available version of SonarQube at the moment of writing and that is 5.4. After I downloaded sonarqube-5.4.zip I will extract it’s content in a folder of my choice and that is D:\SonarQube.

There is another important file we need to get and set before we can continue configuring SonarQube and that is Microsoft JDBC driver. Go to Download the Microsoft JDBC Driver 6.0 (Preview), 4.2, 4.1, or 4.0 for SQL Server and download sqljdbc_4.2.6420.100_enu.tar.gz file. Once done, open the just downloaded file with compression tool of your choice and extract all of it’s content in a temporary folder. Get into sqljdbc_4.2\enu\auth\x64 folder and copy the only file present in that path, sqljdbc_auth.dll and paste it into your System32 directory, usually C:\Windows\System32.

Now we are ready to start the configuration. Open the main configuration file of SonarQube called sonar.properties. You can find it in the conf folder in your SonarQube installation path. Open it with the editor of your choice and search for the line reporting ‘Microsoft SQLServer 2008/2012/2014 and SQL Azure’. Under that line you should see a the following configuration item that is commented out:

#sonar.jdbc.url=jdbc:sqlserver://localhost;databaseName=sonar;integratedSecurity=true

We need to uncomment this line by removing the hash sign in front of it and change the connection string to point towards our SQL database instance (the one we create earlier).
Following, an example of the connection string using a name instance of SQL:

sonar.jdbc.url=jdbc:sqlserver://localhost;databaseName=SonarQube;instanceName=DEV_01;integratedSecurity=true

If you are using the default instance, you can simply omit the instanceName=DEV_01 from your connection string.

Also you can see I’ve set to use the integrated security. If you want to use SQL Authentication, remove the integratedSecurity=true part and specify the credentials as separate configuration items under your connection string (also create users in SQL accordingly and map the newly create user to dbo schema).

sonar.jdbc.url=jdbc:sqlserver://localhost;databaseName=SonarQube
sonar.jdbc.username=sonarqube
sonar.jdbc.password=mypassword

Once the connection string is set, save the configuration file and try starting SonarQube. Open the command prompt and move to ...\bin\windows-x86-64 folder and execute StartSonar.bat

start-sonar

If everything is set right, you should see a message in the console INFO app[o.s.p.m.Monitor] Process[web] is up.

first-run

Now you can open the web browser of your choice and head to http://localhost:9000. A welcome page on SonarQube should be shown.

first-run-browser

If the page loaded, congratulations, SonarQube is running correctly on your machine.

What is left to do is to create a service that will run SonarQube. Stop the current execution with a CTRL+C and terminate the batch job. In the same bin folder where StartSonar.bat is located, you will find InstallNTService.bat. Execute the just mentioned batch file and you should receive the wrapper | SonarQube installed. message. This means that a new service is created. Check your services management console and you should find a service called SonarQube:

services-sonar

As you can see from the picture, service is created but not started.
By default, the “Local System” account is used to execute the SonarQube service. If this account doesn’t have the required permission to create some directories/files in the SonarQube installation directory (which is the case by default on recent Windows versions), the execution of the SonarQube service will fail. In such case, the SonarQube service must be configured to run in the context of a suitable account.
Right click on the SonarQube service and choose properties then move to Log On tab choose “This account”, and select an account that can read/write the folder in which SonarQube is installed. Hopefully you will have a specific service account created for this purpose.

service-logon

Now, you can start the service manually or by launching StartNTService.bat.

Services configuration

SonarQube is the only web application running on my server, so I will move it from the port 9000 to the default 80. To do so, edit the sonar.properties configuration file and find the #sonar.web.port=9000 comment line. Uncomment it and change port value to 80, sonar.web.port=80.

After this change you need to restart your SonarQube service and try to reach your localhost in the browser. If all went fine you will not need to specify the port at the end of the address.

SonarQube behind a proxy

I wrote in the past time numerous post about running services and applications behind a proxy. SonarQube will not be an exception to that practice. You may wonder why SonarQube should have access to internet and my answer is, plug-ins. Plug-ins are essential to SonarQube and installing and updating them is easiest done via Update Center, a functionality integrated in the administrative portal. In order for it to work, SonarQube needs to be able to access the internet. In case you are behind a proxy, you need to modify again sonar.properties configuration file.

Search for #sonar.web.javaAdditionalOpts= configuration line and modify it by specifying http, https proxy host and port:

sonar.web.javaAdditionalOpts=sonar.web.javaAdditionalOpts=-Dhttp.proxyHost=swg.myProxy.com -Dhttp.proxyPort=8080 -Dhttps.proxyHost=swg.myProxy.com -Dhttps.proxyPort=8080

Restart the service and try the Update Center. Open SonarQube web page and log in with the default admin user (password is also admin). Click on the administration menu item and then, in the sub-menu, choose System -> Update Center. Check if the updates are retrieved and try to update one of the plug-ins installed by default, like C#. If all goes well you will see the following screen

update-center

Once the plug-in is installed you will see a button in the notification message that offers to restart the server for you. In my case it never worked and after choosing this option my server stopped replaying. In order to get it back online, you need to manually restart the service.

If you where able to install or update plug-in correctly, then your proxy settings where picked up fine.

Securing SonarQube connection

You can setup SonarQube to run on a https secure connection. It natively supports the SSL certificates however it is not advised to configure it. Using a reverse proxy infrastructure is the recommended way to set up your SonarQube installation on production environments which need to be highly secured. This allows to fully master all the security parameters that you want. I will not dig into details on how to set up IIS to leverage the reverse proxy setup. If interested in this, you can read the following blog post on Jesse Houwing’s blog, Configure SSL for SonarQube on Windows. It will guide you in setting up IIS that will act as a proxy for the secure calls towards your SonarQube server.
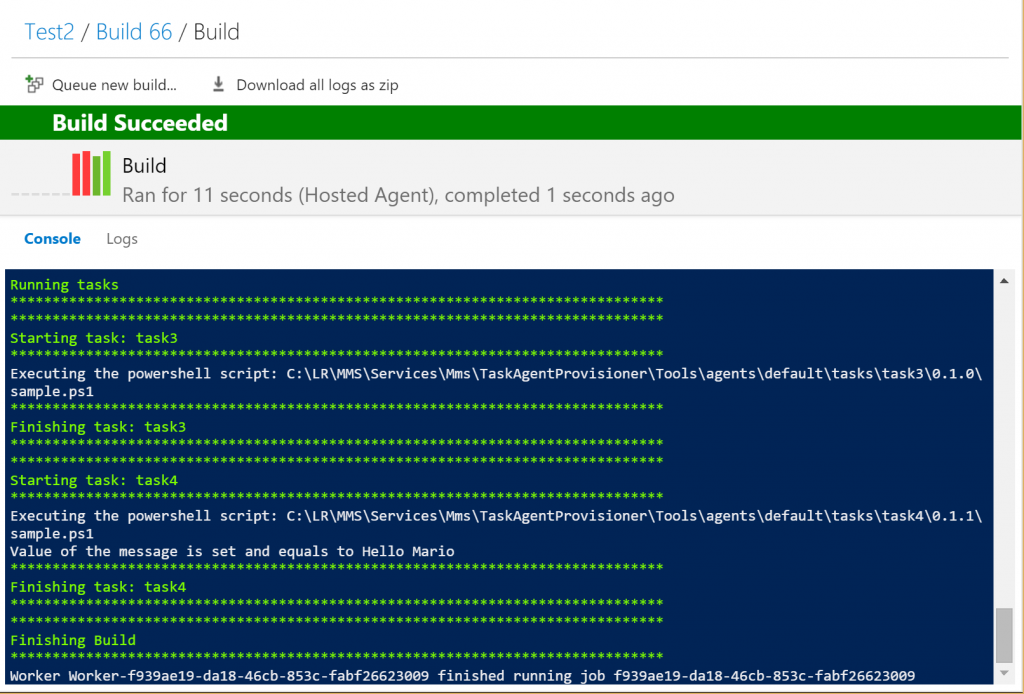
Security configuration

My desire is to integrate the authentication of the SonarQube server with my LDAP (Active Directory domain services). In order to do that, we need to install LDAP plug-in. Locate the LDAP plug-in in update center under available plug-ins and install it.

plugin-ldap

Before you restart your SonarQube service, open the sonar.properties configuration file and add the following section:

#----------------------------------------------------------------------
# LDAP

sonar.security.realm=LDAP
sonar.forceAuthentication=true
sonar.authenticator.downcase=true

This are the only necessary settings if you are part of the Active Directory domain. Restart the SonarQube service and open the portal. If all went well, SSO kicked in, and you should be logged in with your domain account. Now comes the fun part. Log out, then, log in again as administrator and go to Administration -> Security -> Users screen. You should see in the list the domain account you logged in with. Update groups for this account and assign it to sonar-administrators group.
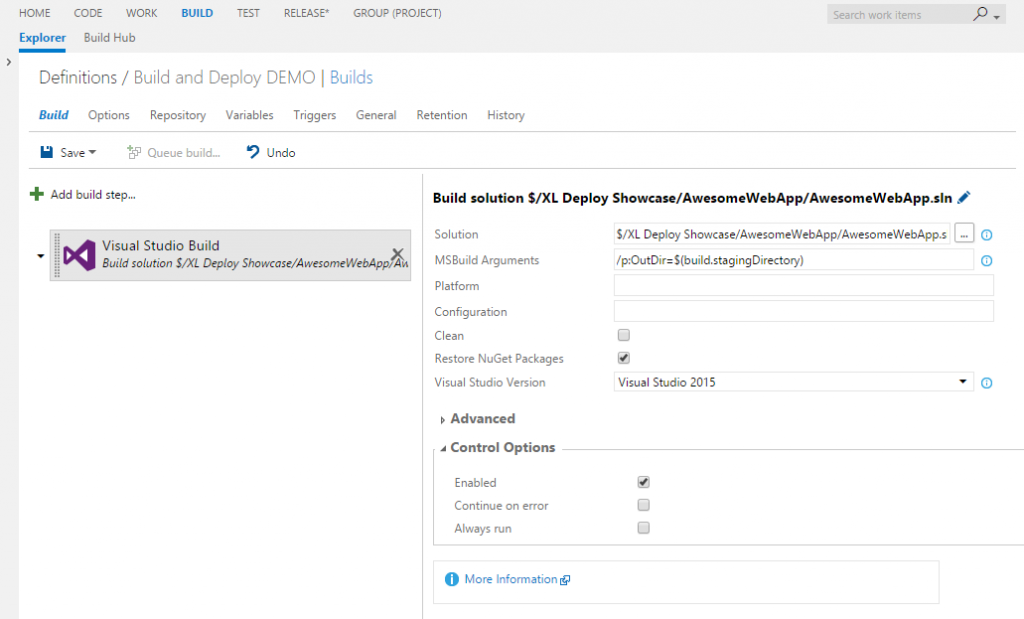
user-to-admin

Now close the browser and reopen it. Surprise, surprise, you are logged in again via your user profile but you do not see Administration option in your menu, as you would expect. Once the LDAP is configured, on each login, the membership information will be retrieved and local settings will be overwritten. Thus no group membership we assigned will be persisted. In this case, LDAP/AD becomes the one and only place to manage group membership. In order to do so, we need to create a security group in AD and map it in the SonarQube Security Groups.
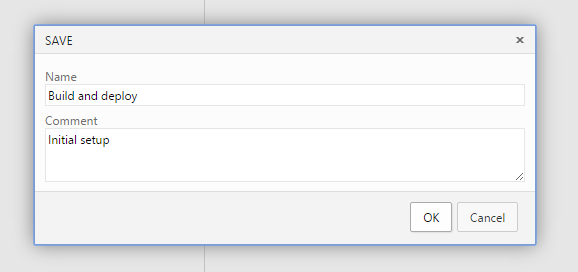
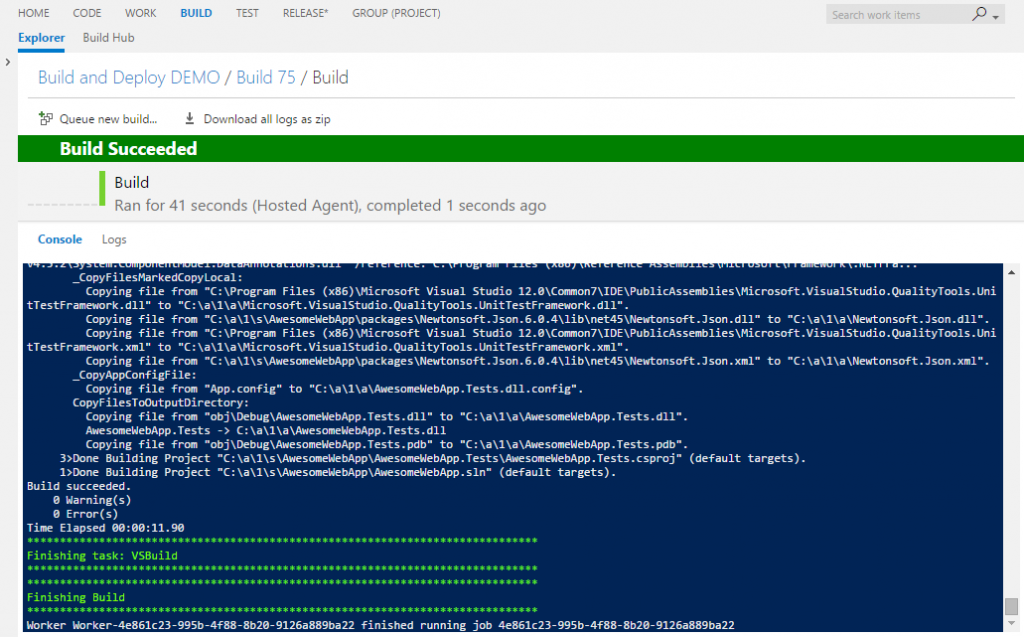
Before we create a new group in the SonarQube Security Groups we need to get the groups precise name. Group names are case sensitive and do require the domain to be specified. This is not something we can guess but we can extract it from our log file.

Add your user to the AD security group of choice. Edit sonar.properties configuration file again and set the logging level to a higher setting. In order to do so, find the #sonar.log.level=INFO line, uncomment it and change the level from INFO to DEBUG. You line should now look like sonar.log.level=DEBUG. Restart the service and open the portal.

If you are successfully logged in, open the log file. In the SonarQube directory there is a folder called logs, in my case it is, sonarqube-5.4\logs. Inside you will find a file called sonar.log. Open it with your editor of choice and search for your domain username. Next to your username (probably at the bottom of the log file) you will find a couple of log lines made by web[o.s.p.l.w.WindowsAuthenticationHelper] and in one of those lines you will find written Groups for the user YOURDOMAIN\YOU and a list of security groups you are part of. Find the correct one and copy it, in my case this is sonar@maiolocal. Now log in as admin and open the Groups screen. Create new group by clicking to the Create Group button in top right corner and set the name to your group of choice, in my case sonar@maiolocal.

create-group

Once the group is created, move to Global Permissions screen (always in the Security menu), and assign the desired permissions to just created group. Let’s suppose that this group will list all of the administrators, under Administer System permission, click on groups and select the newly created group.

Now if you close your browser and reopen it pointing to your SonarQube portal, you will get logged in via SSO and you should be able to see the Administration button in the menu. Same can be done for the users.

Conclusion

This is roughly it. There are some details you would probably like to set as SMTP/Email settings and Source Control Manager settings, however all of this is quite trivial as you can find all of the necessary settings in the UI under General Settings. For more details check Notifications – Administration page in SonarQube documentation site, as SCM support page.

Your SonarQube server should now be correctly installed and configured to access LDAP. Ahhh, I almost forgot it, get the logging level back to INFO, otherwise you are risking quite a large log files on your disk.

TFS Job “Reporting Service Path Rename” failing

$
0
0

Introduction

After migrating our TFS 2015 server to a different AD domain we started seeing in our Job Monitoring page a large number of “Reporting Service Path Rename” job runs failing.

jobmonitoring

In the job details result message we can see the following, The permissions granted to user 'RABOSVC\prd.TFSService' are insufficient for performing this operation., where 'RABOSVC\prd.TFSService' is the application tier service account.

Solution

After a quick check, all the permissions set in the reporting services seemed to be all right. In the ‘Site Settings’ our service account was added in ‘System Administrator’ role, as on the ‘TfsReports’ folder it was set as ‘Team Foundation Content Manager’, and also inside ‘TfsReports’ folder it had also ‘Team Foundation Content Manager’ association on the Team Project Collection folder.

tfs-reports-security

As it turned out this was not sufficient. On the project level folders we also needed to associate our new TFS Service account to ‘Team Foundation Content Manager’ role. Once done, the “Reporting Service Path Rename” job managed to run successfully.

reporting-add-rights

Obviously this needs to be set only once, for the projects created previous to the domain change. Newly created projects will inherit the correct right from the Collection folder.

Although this is not a very common operation/situation, still I hope this can help someone in a similar situation as not many references to “Reporting Service Path Rename” job can be found on Google.

Also I would like to say a big thanks to Microsoft support which helped us diagnosing this issue.

Viewing all 51 articles
Browse latest View live